2011 Revised Project List

With the end of summer just a month away, I am realizing it will be nearly impossible to complete all the items on our Summer Project List.  So, while I was procrastinating on doing the things that needed to get done, I decided to revise our list of projects instead!

Here's what I came up with:

Summer 2011
1. Finish the morning room by adding curtains & a table centerpiece.  (I sent the fabric home with my mom, so hopefully she will be sending me completed curtains soon!)


2. Clear the brush & dead trees from the kids outdoor play area.  (My husband is currently working on this one!)


3. Extend the driveway & add a basketball goal.  (We hired someone to do this, so hopefully it will be done by next weekend!)

4. Paint the entryway/hallway & accessorize.  (I just bought the paint today!)


5. Paint, add moldings, & accessorize the dining room.  (The only summer project that's not even somewhat started!)


Fall/Winter 2011-2012
1. Paint & redecorate the master bedroom.


2. Paint & decorate the master bathroom.

3. Decorate living room.

4. Paint & decorate the guest bedroom.

While I might not accomplish all of my goals before summer's end, I am glad that we finished most of our projects on the list.  Our finished projects include painting & organizing the garage, building a retaining wall & adding landscaping, staining our massive deck, building a patio & shed below the deck, creating an outdoor play area for the kids, & removing some shutters from the front of the house (I'm still debating putting them back up though!).  You can see pictures of these projects by clicking the link at the beginning of this post.

I hope you'll stick around to see these completed projects!  I'm excited & motivated to get them finished!

Featured at Simple Home Life!

Today, as I was checking out my favorite blogs, I was excited to see that Jackie from Simple Home Life featured my Dresser Do-Over on her blog today.  Be sure to check out her blog & all the great projects she's working on!  Also, she has a link party on Fridays, so be sure to link up your projects on her site!

Thanks Jackie!


Moving Furniture with Ease

A few weeks ago, I decided to move the china cabinet from my dining room into my living room.  The only problem was, I was home by myself with my two kids.  Fortunately, I didn't let that stop me.

I have seen the infomercials for "Mighty Movers" (I think that's what they're called) & thought they would be really helpful.  I decided to make my own, by placing the lids from food jars under each of the legs on the china cabinet.


The lids that have the pop-up seal on them seemed to work best, as they were a little stronger.  Mine came from pickle & salsa jars.


I tilted the cabinet up & then slid the lid under the legs with my feet.

Once I had all the lids under the legs of the cabinet, the phone rang.  I went to answer the it & started gabbing away.  While on the phone, my seven-year-old son came in to interrupt (a normal occurrence EVERY time I'm on the phone...) & let me know that he had moved the cabinet all by himself!

{Reenactment}

Obviously, the jar lids made it easier to slide this cabinet into it's new position.  (Don't worry, this piece of furniture may look a little sad & in disrepair right now, but I have some big plans for it's new life in the living room!) 

So, do you have any other suggestions for moving furniture more easily?  I'd love to hear them!  I figure this one could be modified for hardwood floors by gluing felt to the jar lids.

Wendy


Dresser Do-Over

I bought this dresser for $15 on Craigslist a couple of months ago.  I bought it to use in our entry way, since I decided to use our entry table in our master bedroom. 

{Before}

{Before}

I forgot to take a true "before" picture.  This one is after sanding down the glossy black spray paint.  The dresser is made from real wood, & I'm pretty sure it's an antique.

There was nothing wrong with the dresser, but I didn't really care for the glossy finish or the big knobs.  I decided I would brighten it with paint & give it some extra bling.

{The Plan}

Here's how I transformed this Plain Jane dresser.  First, I primed the dresser & painted two coats of Olympic Misty Surf in a satin finish (from Lowes).  Next, I rubbed Minwax Early American stain all over it & then wiped it off, which toned down the paint color & gave it an antiqued look.  Then, I primed & painted the "wood ornaments" purchased at Home Depot.  I painted them Wal-Mart's Color Place Country White & again antiqued them with the stain.  Finally, I added new glass knobs from Hobby Lobby & had my husband add the ornaments to the drawers.  Here's the finished product:

{After}

{After} 

{After...I really think this mirror either needs to be longer or lowered.  I plan on fixing that soon!}

Here's a side by side comparison:

Before                                                  After

I am so pleased with how it turned out!  I just can't wait to get the rest of the entry way painted & accessorized.  That's what I'm asking for for my birthday on Saturday!

Next week, I plan on finishing the morning room & the kids' outdoor play area.  I guess that means I'll be busy this weekend! 

Have a great weekend!

Wendy

I'll be joining these partieies:                            


          Furniture Feature Fridays    

   Photobucket    

Designer Garden

For the Birds

A couple of weeks ago, I showed you these birdhouses my family & I painted.  We finally hung them last week, so here they are now:


We ended up hanging them on the 2x10 that our swing hangs from.  I was hoping that adding the birdhouses would make this eyesore a little more whimsical & fun.  I think it works well, although, the birdhouses look pretty small up there!


We're not sure if birds will take up residence in these houses or not, since the kids are constantly playing nearby.

I'll show more pictures of this area next week (probably) once we get the new sandbox sealed & some more brush cleared.  I'm so glad my kids finally have an outdoor spot to play in our yard!

Garage Features!

I was so excited to find out that my garage organization had been featured on a couple of great blogs!

I almost fell out of my seat when I was reading Just A Girl's blog & saw my garage as one of her favorite projects linked to her Show & Share Day party!  Thanks so much for the feature Chris! 


Lori from Be Different Act Normal also did a feature on my garage!  I am a new follower to her blog, which features a lot of inspiration from around the blogosphere. 


Thanks for the features!  It is so nice to know that my blog can help inspire others!

Featured at Remodelaholic!

I woke up to an exciting e-mail from Justin & Cassity over at Remodelaholic, letting me know they would be featuring our DIY entertainment center today!  I am beyond excited!  Thanks so much for the feature!


Remodelaholic was one of the first blogs I started following.  They feature a lot of DIY projects & room remodels, but they have done some amazing remodels themselves!  Right now they are in the midst of an unbelievable stair makeover in their third house.  You can see that project here.  You can also click these links to see their first and second whole house remodels! 
If you haven't already, please pay Justin & Cassity a visit or even become a follower!  You are sure to find great ideas & inspiration on their site!
Thanks again for the feature!


Wendy

Making Use of Some Studs!

The past week has been extremely hot & humid here, but we fought the heat & tackled our messy garage anyway!  I'm so glad to say we can finally cross another item off our Summer Project List!  Yay!


Below is how the garage looked earlier this summer.  It actually got worse, but I never took another "before" picture, so you'll just have to take my word for it!

{Before}

We didn't think our neighbors would appreciate it if we emptied the entire contents onto our driveway for a week, so we decided to take it one wall at a time.  We would clear the clutter away from the wall, then paint, & finally put that section back together.  By the time we were finished we had purged, organized, painted, & cleaned the entire garage!  Whoo hoo!

{After}

This was the first section to get finished since there wasn't much resting against it.  My husband just hung the camping chairs & ladder.  He also added some shelves in the corner, by the door which leads to the mudroom.  These will hold the kids play shoes & most of my husbands shoes, since they are too big to fit on most standard shoe racks.  (Obviously, we haven't added all the shoes yet, just the ones that were in my way on the mud room floor!)

{After}

Next, Mark created an elaborate pulley system to hang the kayak & canoe on the ceiling.  (I say "elaborate" because it took a couple of days for him to get it right!  Thankfully, he got them raised high enough that he no longer hits his head on the canoe & both vehicles fit underneath!)  He also rearranged how the bikes were hung.

When we built our house, we had the option of extending the mudroom/laundry room into the bump out area of the garage.  We knew we would need that space for garage storage, so we decided to keep it as such.  It makes a great space for Mark's workshop & thanks to some clever organization (& the storage closet in the back) he now has plenty of room for all his tools and more!

{Workshop After}

This was my husband's area to organize & decorate, hence the rim & license plates.  Sadly, we never even took the stickers off the storage cabinets once they were built!

The ceiling in this area of the garage is at least ten feet tall.  We decided to utilize that extra space & make a loft above it.  This is where we store our camping equipment, golf clubs, & a few other items.  We actually have plenty of space for more storage up there & it makes the attic very easy to access. 

{Loft-- the ladder is just 2x4s nailed to the studs}

The next part was the most exciting for me!  We used to store all of the kids sport equipment & outdoor toys in crates lined against the wall, which made it very hard to get out of the truck on the passenger side.  One day, I had the bright idea to utilize the space between the studs.  I took inventory of all the toys & equipment we needed to store & designed shelves, slats, & storage solutions to accommodate our needs.  One of the best things about this idea is that it doesn't really take up any extra space in the garage (except the ball holder) since most of the equipment is stored between the studs.  Anyway, without further adieu, here is what I came up with...

{Stud Storage}

Basically, I had Mark nail slats against the studs to store the fishing poles & boat oars.  We just hung the tennis rackets up with nails. 

Next up, was the ball storage.  To build this, Mark nailed wood to the studs on both sides and then added another piece to each of those to form a "U" shape.  He did this at the bottom of the ball section & also four feet higher.  He drilled holes into the "U" shape & then added three foot bungee cords.  He put the hooks from the bungee cords into the drilled holes.  We added a shelf on top to hold some cones & a couple of other toys.  Now, when the kids need a ball, they just take them out from between the bungee cords.

On the other side of the ball storage, we added a slat to hold the baseball bats.  Above that, we added a shelf with a slat to hold some plastic bases & baseball gloves.  On top of the gloves, we added two more shelves with a slat in front of it to hold baseballs.

The final section of stud storage has a couple of shelves to hold bubbles and chalk.  Below that is a shelf with a slat to hold Frisbees.  We have one more shelf to hold some water balloons & water toys & finally, a slatted section for the much needed water guns!

{The Final Product}
This may not be a Garage Mahal, but it works so well for us!  The kids can get to their toys, we can fit both vehicles in the garage again, & we have plenty of room for additional storage.   I'm pretty sure the neighbors are happy we finally cleaned up this eyesore, since our garage door has been open a lot this summer!

Well, what do you think?  How have you made extra space in the garage?

Sharing here:

Organize It Party at Our Fifth House

A Thoughtful Place
     Photobucket          Photobucket


Family Room Update

I never really liked the picture frame hanging above the mantle in the picture below.


Originally, the frame was brown with gold accents.  After a few months of it hanging, I decided to take the plunge & paint the whole frame the dark brown that you see above.  I felt better about it for a while, but then decided I didn't like the contrast between the brown & the white, especially since that color of brown is no where else in the room.

This past week, I decided to try a new color of spray paint.  I gave it two coats of satin nickel & then brought it back in to hang on the wall.  The faux silver didn't do the frame any favors & my husband just started laughing when he saw it!!  Urgh!  I decided I needed to tame down the silver, so I used a t-shirt to rub some wood stain all over the frame.  After letting it sit for a few minutes, I wiped the stain off.  The result is below:

{Sorry about the crooked candle...}

This accented the designs in the frame & definitely toned down the faux silver.  I'm still not sure I like it, but this is how it will stay for now anyway!

Birdhouses

A few weeks ago we went to Michael's as a family to pick out unfinished birdhouses to paint.  Within a few minutes, Eliana picked out a castle birdhouse, Zeke picked out a pirate ship, my hubby picked out a log cabin, & I picked out a barn (nice & easy...I know my limits as a painter!).

Here they are before we transformed them:

{Before}

Since the temperatures here have been in the upper nineties with a heat index of over 100 degrees, this indoor project was a welcomed escape from the heat!  We sat down as a family & painted our birdhouses.  As a perfectionist, I had certain ideas on how I wanted them to turn out, but tried to let my children freely choose how to decorate them!  (I may have cheated a little, since I touched up some of their paint, but the colors were definitely their own choosing...You'll see.)

{Elie's red, green, & pink castle & Zeke's pirate ship}

{Mark's log cabin & my red barn}

Now, you'll just have to wait to see what is next for these birdhouses!  Once we get a protective water seal on them, I have a fun place to hang them!  (Crossing my fingers this idea works!)

Sharing these here:

Debbiedoos Newbie Party

Summer Projects Updated

Despite my lack of blogging, we have been whittling away at some of our summer projects!  I wanted to wait to post some of the updates until they were prettied up, but since I've lost steam for several of these projects (due to the heat) I have decided to fore go my perfectionist ways & show you anyway!  (You know, since it may be next summer before we add the finishing touches!)

1. The fabric for the morning room curtains finally arrived!  Yay!  Now I just need to work up the courage to sew them!  I spent so much money on the fabric that I am procrastinating making them for fear of messing up & ruining them!  Yikes!  Hopefully, I'll have them finished by next week.


2. We are in the process of painting, cleaning, purging, & organizing the garage.  I'm hoping that this too, will be finished up within the week!  We just need to paint part of one wall & the ceiling & create a little extra storage.

{Before}

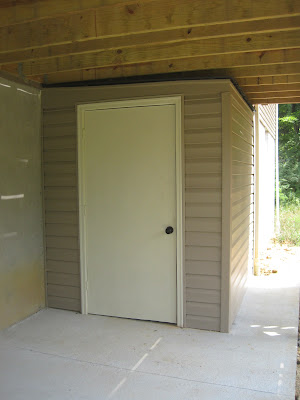
3. We finished up the concrete work under the deck & my husband built a storage closet for the lawn equipment.  This definitely helped clear up some space in the garage!

{Before}

{After}

I'll admit, it's not beautiful, but it functions very well for us!  Hopefully, the addition of some hanging plants, a bag of impatience hanging on the door, a large flower pot, & a porch swing will make it easier on the eye!  Those things will most-likely have to wait until next spring though! 

{Inside}

We chose to build a "storage closet" like this, instead of having a shed in our yard for a couple of reasons.  First, we hoped that this one would blend into our house...especially since our HOA doesn't allow sheds.  Shh!  Also, our yard is sloped, so it would have been difficult to set a pre-built shed on it, and we didn't want it to detract from our wooded views.  

Hopefully, we will be able to enjoy the patio more next spring!

4. We cleared out some of the brush from our woods & added a small zip line and a swing.  We still have some dead trees to chop down & some more brush to clear, but our chainsaw is currently being serviced, so hopefully, this too, will be finished up in a week or two! 

{Before}

{After}

From this view, the swing looks a little crooked, but I can assure you it is level!  This area is at the side of our house, so it is out of sight from both the front & back views of the house.  The red picnic table was given to us by my mother-in-law a few years ago.  It stayed in the basement until we fixed up this area & I decided it would be a great place for the kids to sit & eat Popsicles or get a drink in the shade.  The bucket at the bottom of the tree behind the picnic table, is where the zip line starts.  The kids use the bucket to reach the handle bar.  It ends at the first tree the swing is attached to.  We didn't have any trees with big or low enough branches to hang the swing from, so we bolted a 2x10 into the tree & attached the swing to it.  I have a plan to make it look better, which I will share in a later post!  My mom made the hula-hoop tent & gave it to my daughter for her birthday, which you can see hanging in a tree behind the swing.

So far, we have made quite a bit of progress & hopefully within the next couple of weeks I can cross these projects completely off the list!

In case you are interested in the other projects on the list, you can find it here.


LinkWithin

Related Posts Plugin for WordPress, Blogger...