DIY Mirrored Console Cabinet

As promised, today I am posting the details of how we built the mirrored cabinet in our family room.

DIY Mirrored Console

Supplies
  • 4’x8’x3/4” sanded birch plywood
  • 1”x2”x8’ pine (4)
  • 1-1/8” x 10’ lattice strip (3)
  • 60”x25-1/2” thin piece of plywood (for the back)
  • 2 1/2” wood screws
  • 1-5/8”x7 trim screws
  • 4 knobs
  • 8 hinges
  • 4 double magnetic latches
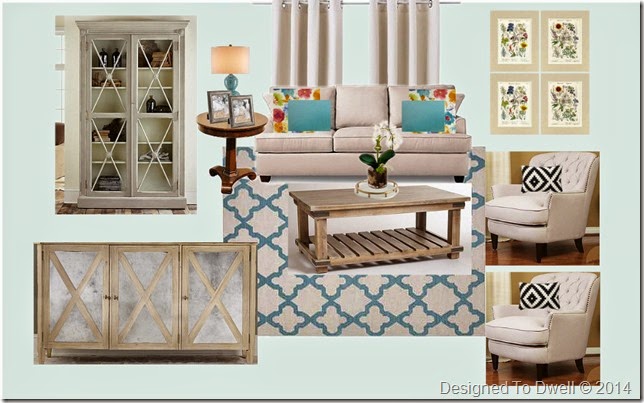
  • 6 Ikea Besta square white legs
  • mirrored glass (wait to purchase this)
  • primer
  • white paint (we used a semi-gloss finish)
  • caulk
  • liquid nails
  • mirror clips
To begin, we had Home Depot cut the plywood into two 60”x16” pieces (top & bottom) & three 25-1/2”x16” pieces (sides & middle).  Then, we attached the bottom piece to one side with three 2-1/2” screws.  Be sure to drill pilot holes first to prevent the wood from splitting. 

IMG_8934

Repeat these steps for the other side.

IMG_8937

Next, add the top piece to the sides the same way.

IMG_8938

Use a tape measurer to mark the middle of your rectangle.  Insert the middle piece at your marks & attach it, again with three screws going in the top & bottom.  (Please ignore the trash spilling out of the recycling bin in the photo below & all the papers on the floor the girls were coloring!)

IMG_8955

At this point, we added the legs & Mark began working on the doors while I sanded, primed, & painted the base piece.  (I used an orbital sander to sand down the raw/cut edges of the wood before priming & painting them.  After doing so, I thought it looked fine, but you may want to add veneer or trim to the raw edges.)  To create the doors, we cut the 1”x2” pine boards into eight 11-1/4” pieces (tops & bottoms of the doors).  Then we cut eight more pieces into 25-3/8” length which would be the sides of the doors. 

IMG_8956

My husband used his router to create an area for the mirror to set.  If you don’t have a router, I’m sure you could omit this step & just attach the mirror using clips.  Then, we attached the side pieces to the tops & bottoms using 1-5/8”x7 trim screws with a kreg jig to create the doors.

Next we attached the hinges to the doors.  In order for inset doors to function properly, a notch needs to be made the size of the hinge plate where it rests on the side of the door.  This allows for ample clearance on the hinge side of the door, while minimizing the gap between the door & the side of the cabinet.

At this point, I recommend attaching the doors to the cabinets just to make sure they do not need to be trimmed down or need any other adjustments.  (It would really stink to find out the doors were too big after the mirrors were cut & installed.)

DIY Mirrored Cabinet

Once we knew our doors would fit properly, we headed to Lowes & got mirrored glass cut to fit our openings.  I recommend measuring all the doors to make sure your glass fits properly.  (FYI:  Lowes will cut your glass for you.  Home Depot will not.)  We also primed & painted the doors before installing the glass.

Once we had our glass, we removed the doors & used some clips to attach it to the wood.  You could attach your mirrors with these fasteners if you did not route the edges of the doors.  We ended up using these clips & some mirror tape, which was kind of janky, but we couldn't find any clips that would work for us.  Be careful not to over-tighten the screw or the mirror could crack.

IMG_8963

We just put one on each side of the doors.

IMG_8964

This is what the doors looked like once the glass was installed.

IMG_8957

After a quick clean of the glass, Mark used an angle finder to determine the angle of the corners & cut the first diagonal piece of lattice strip (which we pre-painted). 

Most miter saws cannot cut such a sharp angle.  There are a couple of ways you can cut these angles.  Number one:  Using the angle finder, trace the line that you need to cut & cut it either using a band saw, jig saw, circular saw, etc.  Just cut it across the line.  Number two:  Some miter saws have a 90 degree fence that can fit into the miter saw.  Using the fence, subtract the angle from 90 degrees to determine what setting your miter saw should be at.

We then attached it using a thin strip of liquid nails.

IMG_8959

Again, Mark used his angle finder to determine the angle of the bottom corner & the angle at which it met the middle of the other piece of lattice.  He then cut the lattice & repeated the same steps to get the top half to complete the X.  Once those pieces were cut, we attached them with liquid nails.

IMG_8960

IMG_8961

You will want to caulk any gaps in the trim.

Once the glue was dry, we re-attached the doors & installed the knobs.  Then we added double magnetic latches.  These act as a stop so the doors don’t push through the cabinet.  The magnets on ours were a little strong, so I put some tape over them to lessen their strength (I feared the kids would pull them so hard they might break the glass…).

latches

Finally, we attached the thin piece of plywood to the back using some nails.

IMG_8962

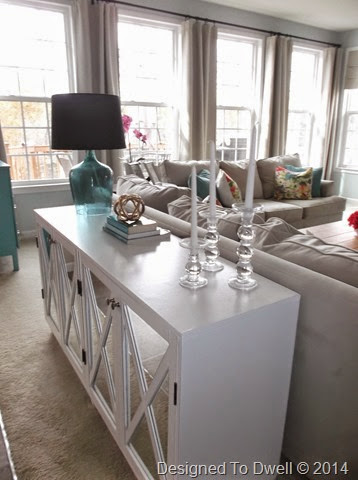
I am still so happy with how this turned out! 


Click here to see the full tour of the family room.


Linking to the Pretty Preppy Party at Less Than Perfect Life of Bliss

The Family Room Challenge: The Reveal

This is the day.  The day in which six weeks of prepping, painting, building, hanging, and styling comes to fruition.  If you don’t know what I’m talking about, I actually chose to participate in a blogger challenge put out by Linda of Calling It Home where we completely decorate a room in just six short weeks.  I chose to make over our family room, which I had been planning to do since January, but had never quite gotten around to. 

Styled Coffee Table

Here is what the space looked like before:


And here it is today from a similar vantage point:

Cheerful Family Room

See that beautiful mirrored cabinet above?  My husband built that in three days from scratch!  I am in love!

DIY Mirrored Cabinet

I plan on sharing a tutorial for the cabinet next Thursday (see it here).  We actually finished it last night (Tuesday) so I just grabbed some things from around the house to style it.  The lamp lives in the living room & is from Target (I don’t think they sell it anymore).  The sphere sculpture was a DIY I copied from Crazy Wonderful.  (Hers turned out much better than mine!)  The candle holders came from Hobby Lobby & sit on the table in the entry way.

DSCF3205 

How about another before?


And today…

Blue Family Room

We purchased two identical Danbury Sofas from JC Penney’s in January, which is what got my wheels spinning for this makeover.  The rug is the Moroccan Aster Rug made by Jaipur.  I found it at a local store for just $70! 

Floral & Turquoise Pillows

I made pillow covers from P.Kauffman’s Impression Garden fabric (My husband prefers them turned over to the white side!) & purchased Ikea Sanela covers in turquoise.

DIY Coffee Table

You can see how we DIY-ed the coffee table here.

DIY Coffee Table & Moroccan Rug

I styled it with books, magazines, a tray, thrift store finds, & a clear blue vase from Michael’s.

Styled Coffee Table

The table between the sofas was a thrift store find that I re-finished.

Refinished & Styled Round Table

Let’s take a look at how the fireplace wall started:


In the last few weeks it has started looking like this:

Fireplace Wall

The chairs flanking the fireplace were another great find.  They are Christopher Knight Club Chairs that retail for close to $300 a piece.  I scored them for $100 each at a local store called Bargains & Buyouts.  (The same place I got the rug.)  Above the chairs I created some inexpensive artwork using some free printables & cheap frames from Michael’s.

Art & Chair Flanking Fireplace

I created some faux-man shades using Sherry’s tutorial (don’t look too closely!) out of the extra Vilborg curtain panel (That’s what we have hanging on the wall of windows).  The throw blanket is from TJ Maxx & the pillow is a modification to the Ikea Lappljung Ruta pillow cover.

Art & Chair Flanking Fireplace

I hung a large mirror on the mantel from Southeastern Salvage.

Fireplace

A vase from Michael’s & flower bud are on the left side.

Mantel Accessories

A faux succulent from Hobby Lobby sits on the right side of the mantel along with some books & a free framed printable.

Mantel Accessories

The wall opposite all the windows is our TV wall.  Here it is before:


It’s hard to believe we re-used these same pieces to create this:

Re-made Entertainment Center

You can see how we tweaked the entertainment center here.  Basically, we cut down the base piece, painted it black, & added new hardware.

TV Console

Then my husband built doors & added them to the bookshelves.  They now contain a mess of toys, books, games, & puzzles.

DSCF3231

We painted a Tarva chest and added it to the back corner of the room.  It basically holds electronic equipment & more toys.

Turquoise Tarva Chest

I hung a decorative flower above the chest (Hobby Lobby) & styled the top with some picture frames (Wal-Mart), thrift store finds, & a DIY urchin.

Styled Tabletop

And that pretty much completes the tour!

In case you would like to see more of the projects completed in the past six weeks, feel free to visit these pages:

Week One:  The Plan
Week Two:  DIY Coffee Table
Week Three:  Paint Color/Artwork/Molding/Curtains/Side Tables
Week Four:  Tweaking the Entertainment Center
Week Five:  We took a break this week to focus on family, Halloween, & my husband’s job, so I didn’t bother posting!

Here is the moodboard I came up with for the room:


And here is the result:

DSCF3201

DSCF3236

The next One Room Challenge starts in 5 months.  If you need me in the meantime, I will probably wiping fingerprints off the mirrored console or praying that my children don’t break the glass!

Please stop by next Thursday to check out the tutorial for the mirrored console.

DSCF3237 


LinkWithin

Related Posts Plugin for WordPress, Blogger...