Tips to Speed Up the Painting Process

This past weekend I painted Zeke’s room.  Since the after pictures aren’t anything amazing, I thought I would share a few tips I use to speed up the painting process, since I am anything but patient!

Paint Stuff 2

Please use these tips with caution & remember that I am not a professional painter (in fact, I’m quite a lazy painter, hence this post!).

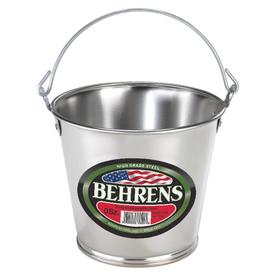
If you don’t already own a ladder, consider purchasing one with a molded paint can hanger.  I hang my paint can on the ladder & don’t bother removing it as I pull the ladder around the room.  I’m sure this saves a few minutes of time from having to climb down the ladder, grab the paint can, set it down, move the ladder to the next spot, grab the paint can again, etc.  Ours also has a handy spot to place your paintbrush too.  I couldn't find our exact model, but here is the link to the one in the picture.

DSC_0693

I would recommend buying a smaller paint can with a handle if you choose the above method.  That way, you can pour a small amount of paint in the can, making it easier to cut-in & move the ladder around without spilling a freshly opened can of paint! 


Another great tool to speed up the cutting-in process is an angled, short handled paint brush.  Using one of these brushes makes cutting in so much easier & precise & saves time, since I no longer have to prep everything with painters tape.


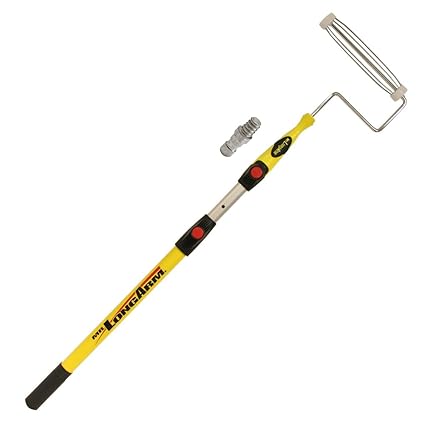
The final tip I have is to use an extension pole for your paint roller.  We are able to unscrew the handle from our push broom & use it as an extension for our paint roller.  It again, saves me time from having to drag the ladder around the room to paint the top half of the room.  Instead, I can paint the whole wall using the long pole.


I was able to paint my son’s room in just a few hours using these tools & techniques.  I hope you will find them helpful too & as always, if you have additional tips, I would love to hear them!

DSC_0676

Above is a quick peek into my son’s brighter bedroom.  We removed the chair rail, trimmed out the window, & painted it Toasted Almond by Olympic Paints.  I hope to be able to reveal more of the room next week!

Paint Stuff 2

Boy’s Bedroom Makeover: The Plans

In 2011, I finished decorating my son’s room.  His favorite color was (& still is) orange, so, I found a comforter that incorporated orange, slathered the walls in orange paint, & gave everything a nautical theme.


It has pretty much looked this way since then, with the exception of a Craigslist dresser we bought in 2013 & the full-sized bed we just passed down to him over Christmas break.  Well, it hasn’t exactly looked as pristine as the photo above!  My boy is a collector.  He has collections of quarters, pennies, rocks, shells, sea glass, cars, silly bands, acorns, rubber ducks…the list goes on.  Every surface top is pretty much covered with his collections or projects. 

Here are my plans for making over this space:

OB-Zeke's Room

Besides an obvious need for storage & appropriate-sized bedding, I would also like to lighten the walls.  This room is pretty small & only has one window.  A new, lighter shade of paint will not only brighten the space, but also create the feeling of a bigger room. In the next couple of weeks, I plan to remove the chair rail & paint the walls Toasted Almond, by Olympic Paints.  It’s the same color I have in the entry & upstairs hallway of our home.  I haven’t actually painted a sample on the wall yet, so this could change.  We will also trim out the window & probably add a stationary roman shade (aka faux-man shade). 

DSC_0592

I am not exactly set on the orientation of the bed.  Zeke would like it to remain as it is in the picture above, but it takes up so much space in his room.  There is enough room to place it against the wall long-ways (like a daybed), but if we do that, I’m not sure what I’ll do about the headboard. 

One thing I am sure of is that it will have a vintage pull-down map hanging above it.  I found a great deal through a local auction site & have one that has been sitting in my closet for two years.  Time to get that baby hanging!  I also know I want to flank the bed with Ikea Rast dressers.  I think these dressers make great nightstands, since they are small, but will add much needed storage.

DSC_0593

The layout across from the bed will remain as it is today.  I’m hoping to find an inexpensive, upholstered chair to take the place of the director’s chair in the corner.  We will hang a mirror (or possibly a gallery wall) above the dresser, & add a tray to hold a 5th grade boy essential—deodorant!  Maybe he’ll start using it if we display it???

DSC_0594

The desk wall will probably change from the mood board above.  With the bed in the center of the room, having a full-fledged desk will really cramp the space.  If the layout stays this way, we will most-likely build a pull-down desk, with a more comfortable stool below it.  A wall of inexpensive shelves will create a place to store Zeke’s books & many collections.

I cannot wait to get this project started! 

Sharing at the Pretty Preppy Party & Evolution of Style!


Home Tour: Bathrooms

Here are some glimpses of our powder room & my kids’ shared bathroom.

Powder Room

We needed to use our small powder room as a spot for our kids to brush their hair & teeth in the morning.  We took advantage of the vertical space & added shelves above the toilet that store toiletries & extra bathroom supplies.

Floating Shelves

Small Bathroom Storage Idea

DSC_0640

To see all the projects from this space, click here and here.

Extra Bathroom Storage

Upstairs, one of our full bathrooms is used by both our son & daughters.

DSC_0619

The décor was inspired by the book Harry the Dirty Dog.

DSC_0632

I painted the vanity black, framed the mirror, & added a black toilet seat to make this builder’s grade bathroom have a more custom look at an affordable price!

DSC_0623

I hung a pair of striped curtains at ceiling height to create a more spacious feel & added art to the inside of the shower for the pretty factor.

DSC_0622

Some framed pages from the book this look was inspired by fill up an empty wall.

DSC_0629

Coral & white towels hang below the art.

DSC_0634

Click here to see all the projects & sources for this space.

DSC_0620

So, that completes the tour of finished spaces!  On Tuesday, I’ll share the plans I have for my son’s room with you.  Hopefully, I can add another room to the tour soon!

Home Tour: The Family Room

It’s only been a few months since I revealed the family room makeover, but since I took the pictures with my old camera, I thought I would take more with my fancy camera since it is much better quality.  (Same novice photographer who can no longer blame the camera for poor quality!)

 Colorful Family Room

One of the first things you see when you enter the family room is the DIY mirrored cabinet my husband built.  I love this table so much I want him to build another one for the morning room!

DIY Mirrored Cabinet

This makeover began with the purchase of two Danbury Sofas from JC Penney’s.

Danbury Sofa

The old, rectangular coffee table no longer worked with two full-sized sofas,

Family Room Decor

so we built a large, sturdy, stylish coffee table that makes a great spot to prop your feet.

DIY Coffee Table

I struggled with how to style it, but I’m so happy with what I came up with, without spending any money!

Styling a Coffee Table

I was able to score this Jaipur rug for a great deal at a local store called Bargains & Buyouts.

Turquoise Family Room

During the makeover, I refinished this wooden table I found on Craigslist & easily styled it with an orchid & some frames.

Side Table Styling

We took apart our old DIY entertainment center to create this space for electronics & toy storage.

Entertainment Center

After detaching & shaving off some of the bulky base piece, it got a coat of black satin paint & pretty gold hardware.

DIY TV Console

We added doors to the bookcases to conceal game, puzzle, book, & toy storage.

Adding a Door to Bookcases

The fireplace wall looks less bare,

Fireplace

thanks to some bargain chairs

DIY Artwork

& printable artwork.

Chairs Flanking Fireplace

An Ikea dresser got a coat of turquoise paint, & took the place of cluttered cube storage.

Ikea Tarva Chest

Tabletop Styling

It’s hard to believe that just a few months ago, this room:

Pretty Family Room

looked like this:

Family Room Before

To see a complete list of project links & sources, click here.

Family Room After

I have one last space to share with you on Thursday.  I hope you come back!

LinkWithin

Related Posts Plugin for WordPress, Blogger...