Showing posts with label Nook. Show all posts

A New Look for the Nook

When I last left you, I had just finished trying my hand at painting a floral picture.  After I filled in about a million nail holes, I patched the paint with a different brand of chalkboard paint, since Lowe's didn't carry the Rustoleum paint I originally used.  Please people, learn your lesson from me, & don’t do that!  The paint touch ups were totally obvious & I ended up needing to re-paint the entire area.  Live & learn.

After the paint dried, I hung my artwork in the nook using some sticky tack & command hooks & added a piece of plexi-glass on top of it, using anchors & some gold screws.

IMG_8586

IMG_8583

IMG_8584

IMG_8587

I will now declare myself the world’s worst blogging picture taker!  So sorry for my lack of photography skills!  I really do like the way it turned out, & it definitely looks much better in person than in my pictures!

Linking here:
Best of the Nest

DIY Floral Painting

I fell in love with the Lulie Wallace calendar at Anthropologie, which is unfortunately no longer available.  I love how bright & cheerful her paintings are & I thought they looked simple enough to try & re-create.  I was inspired mainly by “Flowers for Avery” & decided to try my hand at painting.
First, I picked up a watercolor poster board from Hobby Lobby.

IMG_8568

Next, I lightly sketched my design.  (It’s really on there, but you can barely see it!)

IMG_8569

Please keep in mind that I only took Art 1 in high school & I really know nothing about depth/perception/mixing colors/shading (the list goes on…) & this painting really doesn’t make much sense as far as how the flowers are situated!  Let’s just pretend they are randomly sitting on a table & this painting is a view from above & there is a random yellow ribbon on the table!

Anyway, I painted the flowers first, next the leaves, & finally, the background. 

IMG_8575

Despite not really knowing what I was doing, I’m pretty happy with the results.

IMG_8577

So happy that I removed the picture gallery from the nook.

IMG_8578

I’m hoping to have it hanging soon, but first I need to fill in about 50 nail holes!

We Are Thankful!

A few days ago I mentioned that I would show you the other chalkboard wall in our nook.  Originally I had told the kids this would be a place for them to create chalk drawings, but then I decided to do something special in this spot for the holidays.  Enter the “Thankful Wall”…


IMG_6062


As artfully as I could, I wrote the words, “We are thankful…”  Throughout this month, I have encouraged my husband & kids to write different things they are thankful for on the wall.  It is definitely encouraging to walk through the doors & see that someone is thankful for you! 

In addition to writing down things we are thankful for, we are also learning 1 Thessalonians 5:16-18, which says, “Always be joyful.  Never stop praying.  Give thanks no matter what happens.  God wants you to thank him because you believe in Christ Jesus.”  (NIRV) 

We also have a We Are Thankful Jar, which we are trying to get through.  It is basically a jar of ways to show you are thankful.  Each day in the month of November, you pick something out of the jar & do it.

So far, this month has been incredibly busy, and we haven’t done the best job at reflecting on all we have to be thankful for.  Since this may be my last post before Thanksgiving, I want you to know how thankful I am for all of you who read this blog!  Just seeing that people are reading makes me happy, but I am especially grateful for those of you that leave encouraging comments!  It makes my day!

I hope you & your families have a wonderful Thanksgiving!

Hanging Decorative Keys

About a month ago, I purchased these keys for $1 each at Michaels'.


IMG_5950


At the time, I thought I would probably frame them & hang them on our new gallery wall, but when I got the layout the way I wanted, I decided not to use them in frames. 


Hanging Decorative Keys 


I knew I didn’t want to hang them with ribbon, & I didn’t want to have to put two nails in the wall to hold them up.  First I experimented with sticky tack, but they kept falling off the wall after a couple of hours.

Finally, I decided to hammer nails into the wall where I wanted them.  Then, I wiggled the nail out of the wall & glued the nail head to the back of the key, like so:


IMG_6053


I kept some sticky tack on the keys & then carefully pushed the nail back into the hole.
So far, it has worked perfectly at holding up the key without the nail being visible!


IMG_6054


Seems like the perfect solution to my problem!

DIY Wall Clock

Today, I thought I would share with you how I made the chalkboard wall clock that is part of our new gallery wall.  Before attempting this project, I tried “googling” directions, but came up empty handed.  Hopefully, this quick tutorial will be helpful for anyone creating their own wall clock.


IMG_6049


First, I purchased a small clock making kit from Hobby Lobby for $6.99.  The clock kit is made to be used with a face (the part of the clock with numbers on it) & they have different ones depending on the thickness of the face you are using.  I purchased one meant to be used with a 1/4 inch thick face, although I wasn’t planning on using a clock face for this project.  I also purchased a package of 4 1/2 inch gold spade hands, since the hands that came with the clock kit I bought were a little smaller than I wanted.  I didn’t take a picture of the actual products before starting this project, but the picture below is a good representation of the clock components that came in the kit:


Source: amazon.com via Wendy on Pinterest


Next, I needed something to cover the clock motor.  I ended up finding a 3 1/2 inch wooden circle from the wooden decoration section of Hobby Lobby.  It was actually painted like a globe.  Again, I failed to take a before picture, so you’ll just have to use your imagination!

When I got home, I asked my husband to drill a hole in the wooden circle.  Then, I painted it black.  Once it was dry, I assembled the clock parts following the directions on the back of the packaging.  Instead of the clock face, I used my wooden circle.


IMG_6067


I should mention that I also painted the “hanger” (#1 in the picture) black to blend in with the wall, but I am now seeing that I could have removed it & hung the clock differently (Command strips maybe?).

The next step was to hang the clock on the wall & draw in roman numerals for 12, 3, 6, & 9 with chalk. 


IMG_6050


I think it turned out really cool, & the process was actually pretty simple!


IMG_6044

Black & Gold Chalkboard Gallery Wall

In my last post, I showed you the small nook that connects our laundry room with our kitchen & family room.  I felt this small space could make a big statement by painting it a bold color & adding some fun accents.


IMG_6049

I started the transformation with a couple of coats of  Rustoleum’s Chalkboard Paint.  Then, I waited forever three days before “setting” the chalkboard by holding a piece of chalk sideways & rubbing it all over the walls.


Chalkboard Walls

Then, I erased the walls completely & cleaned up a ton of dust!

While I waited patiently for the paint to dry, I scoured thrift stores & our basement hoard for goldish/ brassy things to hang.  I taped off a section of the floor that was the same size as the wall & played around with the arrangement until I found something I liked.  It took me a while to get the layout right, but once I did, I was ready to hang everything.

So, here’s how it turned out:
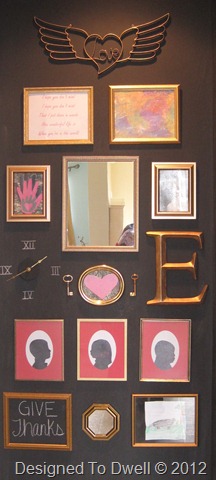

IMG_6042

Sorry about all the “Where’s Waldo” pictures!  As much as I tried to stay out of the reflections, I think parts of me ended up in all of them!

I really wanted to make this wall a meaningful reflection of our family, so I was immediately drawn to the angel’s wings when I saw them in Hobby Lobby.  They reminded me of a tattoo worn by a Harley riding motorcyclist, which made them very cool, but I also thought they would be the perfect item to represent the baby I miscarried a few years ago.  With a coat of gold spray paint & a spot high on the wall, they are a happy reminder of the little angel that awaits us in Heaven someday.


IMG_6047

Below the angel wings, I framed some words from “Your Song” by Elton John.  I thought it was a great reminder to my family how much better their presence makes the world!  Obviously, I didn’t spend much time playing with the typography on the lyrics.  I might change the way they look later, but right now, I’m okay with it!

The frame on the right holds one of my favorite paintings from my daughter Eliana.  My original thought was that I could change out the kids’ artwork every once in a while, but I love this piece so much, I’m not sure I’ll be able to replace it!

IMG_6049

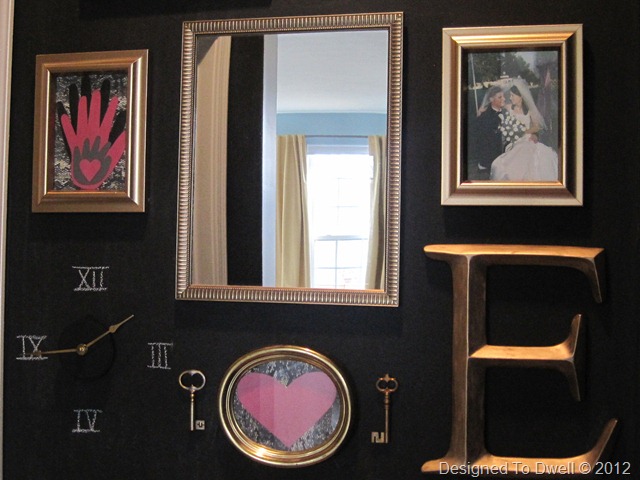
On the next section of wall, I centered a very cheap mirror from Wal-Mart.  (I think it cost less than $5.)  Then, I flanked it with a couple of frames I spray painted gold.  The frame on the left holds my kids’ hand print tracings & a wedding picture fills the opposite frame.

Below that, we hung the letter E to represent our last name, some keys, a DIY heart (from craft paper), & a DIY wall clock.  I’ll post a quick tutorial on the wall clock in a couple of days.


IMG_6058

The bottom section of the gallery wall holds three silhouettes of my kids, an empty frame, small mirror from a thrift store, & a framed drawing of an armadillo by my son!  For now, the empty frame says, “Give Thanks” but I plan on changing it for different holidays.  I can picture, “I’ll be HOME for Christmas”, “Home is where the heart is”, “I Love You”, & lots of other words & sayings filling this space in the future.


IMG_6044

So, there you have it.  I love the bold color, meaningful artwork, contrast between the gold & black, and the practicality of the mirror & clock (to help us get out the door looking good & on time!).

Are you feeling daring in your décor, or do you prefer a safer attitude towards decorating?

I'll be back on Friday to show you how I DIYed the clock & some other details on the wall.  Then, next week, I'll show you what we did with the perpendicular wall!

Sharing here:
Working With What You Have link up at emilyaclark.com


A Look at our Nook

We have a small nook that leads into our laundry room from the kitchen/great room area:


Lately I've had the urge to paint it a dramatic color & fill it with a floor to ceiling gallery wall.  Something like these, (not the colors, just the gallery):


I plan to fill the space with sillhouettes of the kids, their artwork, the letter "E" for our last name, a mirror, some song lyrics, & anything else I can find!  Right now I'm thinking the frames will probably be linked in color... I'm really liking brassy/gold colors right now.

After playing around with some pinkish/red & dark blue color swatches, I think I'm probably just going to paint the area with black chalk paint.  I already have some on hand, & what's more dramatic than black?

I'm always welcome to other ideas though!  Do you have a dramatic color suggestion for this area?


LinkWithin

Related Posts Plugin for WordPress, Blogger...