Showing posts with label Exterior. Show all posts

Exterior Updates

The last time you saw the front of our house, it was looking like this:


Then the glass broke on the post lamp, which stopped working every time a ball hit it (which happens on a daily basis around here) and the flat, red paint on the door started fading.  It was definitely time for an update.

IMG_8667

We began by taking out the post lamp & disconnecting the electric from the house.  Someday, I think it would be nice to use the electric that used to run to it (which is safely capped off at the house) on some nice landscape lights, but for now I'm just happy the above eyesore is gone!

IMG_8680

After giving the front door a few coats of semi-gloss black paint, I decided we needed to replace the brown lights on the front of the house.  I found a great deal on these lights at Menards (just $35 for a 2-pack of lights!).

IMG_8681

I also found some new turquoise planters at Big Lots and added hot pink geraniums to them.  I could obviously use some tips on how to care for geraniums.

IMG_8682

I'd love to find a larger, more colorful mat for the front door, but I haven't seen anything I like yet.

IMG_8685IMG_8684

From this picture you can see that the post light is gone.  Someday, I would love to have a pretty glass door, but for now, the black is much better!

So, have you started any exterior projects?

Patio Update

The last time I blogged about our patio, it looked like this:

Patio Before

As I warned in that post, it got worse!

  Before

Okay, this was after we started organizing the storage closet, but it had already acquired a lot of junk!

After organizing the closet & power washing the wall & patio, things were looking much better…

Patio

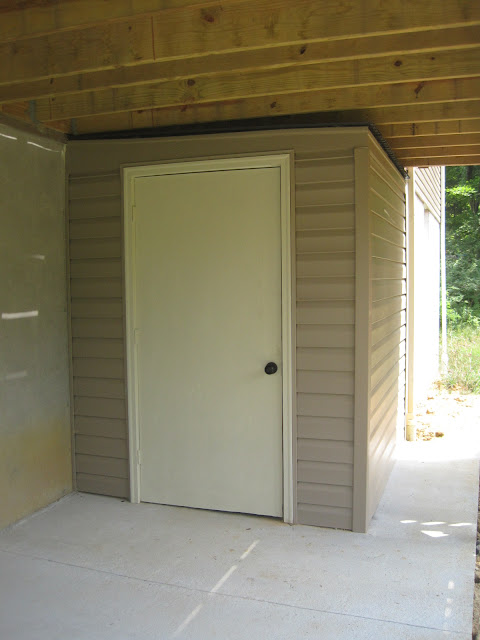
The old door was a hollow interior door that started falling apart once it got wet.  We replaced it with a solid wood door & painted it black.  We also scored a great deal on a swing & I accessorized with a palmetto plant (which is currently residing inside until it gets warm again) & an indoor/outdoor rug I originally bought for the entry way.

Under Deck Patio

We added a few strings of patio lights, which look awesome at night, but you’ll just have to take my word for it!

I really wanted to do something to the concrete wall.  Despite it being more clean, I still think it’s ugly!  Any ideas?

DIY Deck Mounted Umbrellas

When we built the deck off the back of our house, I couldn’t wait to start dining alfresco!  The sun sets behind our house, which has been an issue when eating dinner outside.  The table umbrella helped a little, but we needed something else to help block the sun.

Over the summer we attended a party, where the hosts had umbrellas mounted to their deck.  Mark & I both thought this would be a good solution to our problem, so we set out to buy a few tilting umbrellas & mount them to the deck.

Basically, after purchasing the umbrellas, we decided on their placement.  We mounted them on the larger deck posts in the bump out.  Next, my husband added two of the fasteners (seen below) to the deck, where the bottom & middle of the umbrella would hit.

Mounting a Deck Umbrella

Mark added a nail below the bottom fastener to keep the umbrella from falling through.

Mounting a Deck Umbrella

Once the hardware was installed, we slid the umbrellas through.

Deck Mounted Umbrellas

These definitely help the problem during dinner time.  We also think the opened umbrellas kept our house cooler during the day, since they were blocking the sun.  Win, win!

Creating an Outdoor Fire Pit


Fire Pit 10
When building our house, we chose our lot based on the beautiful wooded view.  Unfortunately, that view came with a steeply sloped back yard.  We knew that with a little creativity, we could figure out a way to make our sloped yard functional.  Last summer, while watching the kids play in the woods, I noticed this:
 
a small amount of flat space at the bottom of the hill.  I mentioned to my husband that it would make a great place for a fire pit.  We added the project to the summer list & Mark got started right away!  In the picture above, he has already begun finding creek stone from the creek bed & started getting the ground level.
The first official project was to build a small retaining wall.  We decided to give this wall two functions.  First, it would prevent erosion & secondly, it would act as a bench for seating.  We ended up using landscaping timbers to do this pretty inexpensively.  (During Memorial Day, Home Depot had them on sale for $1 each!)
The next step was to build a French drain, since this area sits at the bottom of a hill & needed to have drainage.  A French drain is a pipe with holes in the top of it, which allows water to seep into it & then channels the water to where you want it to drain.  To do this, Mark dug a trench & added the drain.  Then, he added a layer of gravel above it to further help with drainage. 
Installing a French Drain
We Mark then covered the area with crushed limestone.  Then, he traced out the area where the fire pit would be & added the creek stone, which would become the patio.  After purchasing the pavers, Mark built the fire pit by stacking stones in a circular shape.  (He grabbed a free brochure next to the pavers, which gave directions, dimensions, & the amount of pavers needed.) 
IMG_4549
We then added pea gravel to fill in the gaps between the creek stone. 
Here are some pictures of the finished product:
Creek Stone Patio
The Adirondack chairs came from Lowes & were about $20 each.  I think they give a nice pop of color to the area.
Fire pit
Fire Pit 13
Retaining Wall with Tiki Torches
Natural Steps
I waited too late to get some night shots, but here is my attempt at one showing how the area looks all lit up…
Fire Pit at night
The above definitely doesn’t capture how cool it looks with the tiki torches lighting the path at night.  Oh well, I tried!
Creek Stone Patio
We just love this area of our yard now!  It feels like we are camping in the mountains, far away from suburbia!

Linking Here:


The Great Outdoors

We spent the majority of our Memorial Day weekend in the great outdoors!  It wasn't as wonderful as it sounds, since the temps were in the 90's and we were weeding, mulching, & planting in the hot sun.  Here are a few quick pictures of our front yard spruce up...

We added this little bed next to the newer driveway extension.  The tree should get about 15 feet tall.  Next year I'll probably add some lillies here too, since it will likely be a while before the tree grows quite that tall.


New mulch and some purple petunias on the other side of the house...


More annuals & mulch...


 Maybe next year I'll get a hanging basket for our lamp post.


So, we can officially check two things off the Summer Project List.  Have you crossed anything off the list yet?  I'm not getting too excited since we usually have a strong start & quickly fizzle out of steam for the rest of the projects!

For Real Friday: The State of my Mums

From now on (until I change my mind anyway!) I am going to be sharing the ugly truth on Fridays! 

Earlier this month...or was it last month...I planted beautiful yellow mums in the urns on our front porch.  Here's a reminder of what they looked like:

{Earlier}

This is what has become of these colorful flowers:

{Today}

I have a problem with consistency when it comes to a lot of things...watering plants is just one of them!  Since the leaves were still green, I decided to "deadhead" all the buds & hope that some new ones might form before the end of the season.  If not, it still looks better without all the brown, dead, flowers!

{Looking a little more green!}

My plan is to start watering these again.  We'll see how long the leaves stay green!  Wish me luck!

Concrete Extension & Basketball Goal

Our son was really wanting a basketball goal (& quite honestly, so was my husband!), so we told him he needed to show us that he wanted one by practicing basketball.  My husband made a chart, & Zeke got a check mark for every 30 minutes he practiced.  He finished his chart around May, earning himself a basketball goal.

Before we could get the goal, my husband wanted to extend our driveway.  That way, Zeke would have more room to play basketball & we could fit more cars in our driveway when we have company.  (One of the downfalls of living in a cul-de-sac is that there is no street parking in front of our house.) 

Here is what our driveway looked like before:

{Before}

This picture was taken after we transplanted the ornamental grass, which used to sit to the right of the driveway, in front of the house.  It's brown now, but I really think it will come back in the spring.  (At least I hope so!)

Below is a picture with the driveway extension:

{After}


{The extension}

Now, I'm just hoping we get our money's worth out of this!  It's been in since Friday night, & I think Zeke has played a total of 15 minutes with it!  

I Shudder at the Shutters

I mentioned in my project list, that I didn't like the look of these shutters:

{Before}

My husband took them down a couple of weeks ago, but I'm not sure how I feel about the window now.


I still agree that I don't like the pointy part of the original shutters, but I thought the brick was laid around the window, & upon removing the shutters realized it was not.  Now I'm thinking of having him put the shutters back up, but without the pointy part (it was just clipped on to regular shutters).

What would you do?  Leave it as-is, or try putting the regular shutters up?

Wendy

The Deck is DONE!

After weeks & weeks, the deck staining project can finally be crossed off the list!  I mentioned in my project list that my husband spent the entire summer last year building this deck himself!  It was a labor of love that needed to be done, since we had a door that led to a 2-story drop!  The deck looked great, but I knew it would be even better once it was stained.

{Before}

It was recommended that we wait a year to stain it, so the wood could dry out.  I couldn't quite wait a whole year, since it wasn't finished until the end of the summer last year, but figured a few months wouldn't hurt anything!

{After}

{Not a glamour shot!}

Sorry for the ugly scenery in this picture, but I wanted to show the landing & steps.  The concrete for the patio is getting delivered today, so hopefully, it won't be too long before we make this area look pretty!  I would love to try something like this to camouflage the exterior basement wall.  I found the idea on the blog Classic Casual Home.  We'll see!

{After}

It is such a relief to finally have the deck complete.  This project tested my heat-resistance (I started this when the temps were in the upper 90's), pain tolerance (Oh, my aching back!), & patience (Who'll Stop the Rain).  Needless to say, next time we're paying someone to do this!

Have you ever started a project & then realized it would have been much better to have hired help instead?

Wendy

Sharing at these parties:

Show & Share Day at Just a Girl


   Weekend Bloggy Reading  


Landscaping Retained!

So, I finally convinced my husband to build a small retaining wall around our front landscaping!  Yay!  I gave you this sneak peak a few days ago:


And, here is a bigger view of it:


I can't really tell you how he did it, since I wasn't able to help on the two days he worked on it.  The basic steps were to dig out the area & add some sand to level the blocks.  Once they were all in place, he added tiny pea gravel to help with drainage & then filled it with topsoil until it was level with the rest of the ground.

Of course, once the new wall was in, we had to add some additional landscaping & mulch to spruce it up even more!


We kept the boxwoods in their place and added some type of evergreen shrubs in front of them.  We also moved our hostas around.  Then we added:

a Green Lace Leaf Japanese Maple, red Coleus, some sort of petunia, and...


some yellow Tickseed.  (I think these are deer resistant!  Wahoo!)

With the left side looking so good, I couldn't just leave the right side of our door looking sloppy, so I we again moved & added some plants.

We added some adorable, red Poppies...


and some beautiful Dianthus.


We moved our boxwoods to the back and moved both our hostas & barberry bushes into triangle shapes to create the look below:


And now here's a picture of the whole house:

{Trying to block the sun out of the picture!}

And, just in case you forgot what it looked like before:
{Before}

{After}
Finally, one thing completely crossed off the Summer Project List!  How are your summer projects coming along?

Wendy

Sharing here:


Photobucket  Weekend Bloggy Reading    


LinkWithin

Related Posts Plugin for WordPress, Blogger...