Showing posts with label Furniture. Show all posts

Morning Room Challenge: Curtains & Chairs

Yikes! We have quickly come to week five of the One Room Challenge hosted by Linda of Calling It Home. I have just one more week to finish up a few projects in the morning room & reveal it on the blog. Here's what happened so far:


Last week the room saw no progress, as I took a break to work on these:


My kids have been plotting this "happy meal" theme for almost a year! Evie, my youngest, desperately wanted to be princess Anna, so she became the happy meal toy (although several friends thought she was representing "Wendy's").

Anywho, this week did see some progress, although not as much as I had hoped for...
 

I removed the bottom seams from the curtains to lengthen them, since they were several inches too short & then we hung them up.


You can tell by the crease in the above picture just how much extra length ripping the seams gave me. It was probably a good three inches!
 

On Sunday, I started the painstaking process of refinishing 6 chairs I found on Craigslist. You may not be able to tell from the pictures, but they were disgusting! The foam in the seats had totally disintegrated & they sprinkled yellow dust whenever they were touched.  


They look much better after sanding & painting them & replacing the seats cushions.


The great thing about these chairs is that they are less bulky than our old ones, allowing us to fit six chairs along the sides. I also appreciate the lower profile of the chair backs, since the taller backs on the old chairs hindered the view out the windows.


As you can see from the list below (or the picture above), I still have one pretty big project to complete for the room-- refinishing the table. Blech! I am not looking forward to that one! 

The Plans
1. Replace the small "buffet" with a white Ikea Malm dresser.
2. Add trim around the windows.
3. Replace the curtains.
4. Re-finish the table in a darker stain to minimize the "orange-y oak" look.
5. Replace the chairs with two different styles.
6. Give the secretary a makeover in the form of black paint.
7. DIY artwork
8. Add new lamps & accessories to provide cheerful pops of color.
 
Be sure to visit the rest of the One Room Challenge Makeovers! 


Morning Room Challenge: Painting the Secretary

Week two of the One Room Challenge is officially in the books!  I didn't get as much finished as I wanted, but we did make some headway. The main project for the week was to paint the secretary desk that I bought a while back.


I really loved the clean lines & the fretwork in the glass, but wasn't a fan of the orange-y oak look. I decided to paint it black to update the look. 


I painted it Olympic Paints' Black Magic in a semi-gloss finish. It's reading pretty gray in the pictures, but it is actually darker than it appears. I love that it is more of a soft black, so it doesn't look harsh with the light colored walls.

 
My UH-OH MOMENT: In order to create less mess when painting the fretwork, I stuck paper underneath it (& on top of the glass). What I didn't realize is that the paint went underneath the fretwork & glued the paper to the back of it. I ended up having to use a knife & some rough sandpaper to remove all the paper stuck on the back of the grids, & ended up scratching some of the glass. Grrr... Now to find a solution for all the scratches...


I couldn't wait to add some pops of bold color against the black & I think it turned out pretty great using accessories we already had around the house. The "hustle" & "You make all things new" printables were free. You can find them here and here. The other artwork was done by my daughter & the origami swan was made by yours truly! Proof that decorating doesn't have to cost lots of money!
 

The Plans
1. Replace the small "buffet" with a white Ikea Malm dresser.
2. Add trim around the windows.
3. Replace the curtains.
4. Re-finish the table in a darker stain to minimize the "orange-y oak" look.
5. Replace the chairs with two different styles.
6. Give the secretary a makeover in the form of black paint.
7. DIY artwork
8. Add new lamps & accessories to provide cheerful pops of color.


You can see the before pictures & plans here.

Be sure to check out all the other makeover madness at Calling It Home.


Also sharing here


Less-Than-Perfect Life of Bliss

DIY Pull-Down Wall Desk

Seven months ago, I decided it was time to re-decorate my eleven-year-old son's room & immediately sold his metal desk with hopes of replacing it with an X base desk.  Once we installed his full-sized bed, it became obvious I needed to come up with a different solution.  I decided to put my own spin on the Ana White Flip Down Art Desk.


We made ours 30" wide by 18" tall and opted for a magnetic board instead of a chalkboard on the front. We found the sheet metal for about $10 at Lowe's (it was in with the H-vac/conduit stuff).


I would have rather stained all the wood, but we were using leftovers & only had painted trim, so I covered it in black paint. (To be completely honest, I'm not really loving the look...)


We divided the inside in half & added a chain across the left side to hold some of Zeke's notebooks & magazines. On the right side, we added a shelf about 10 inches high to hold smaller items & the bottom shelf holds pencils, chalk, & crayons. I decided to paint the desktop in chalkboard paint for any notes Zeke may need to make.


We used two different types of hinges to keep the desktop at a sturdy 90 degree angle.  This was definitely the biggest struggle in the building process, which may have been user error!

  
 The roller catch we used keeps the desktop closed securely when not in use.  (You can see the strike on the desktop in the picture above & the catch is on the underside of the top part of the wall piece.) 


We secured the desk to the wall by using small L-brackets in each corner, making sure to get some of them into the studs.


Since we weren't able to give Zeke the X-based desk, we gave him an X-based stool instead.


We used these instructions for building the stool, but changed the size of ours to 19" wide by 12 3/4" deep by 19 1/2" tall (including cushion). We decided to put the wood on all four sides under the cushion, unlike the tutorial which only has it on the sides.  I stained the wood in Minwax Early American & cut two pieces of an old foam mattress topper to cushion the stool, along with some leftover fabric from Zeke's pillows.


After seven months, I am glad to finally have all of Zeke's stuff off the floor & back in his desk! Although I don't really love the aesthetics of this desk, I really do like it's function & space saving design.  Surprisingly, it holds more than my daughter's one-drawer parsons desk.


Girl’s Bedroom Makeover: The Furnishings

Welcome back to another One Room Challenge update!  Believe it or not, but I have chosen to take on a challenge to finish up one room in my home in just six weeks.  Today is technically the third week.  I have been working on my eight-year-old daughter’s room (Elie).  You can see my plan for it here

I am really hoping this room turns out looking good, but I’m starting to have my doubts.  Spoiler alert—we hung some curtains & I think they are all wrong.  Time will tell!  I’m hoping they look better once we get the bedding & accessories in place.So, back to this week—Basically, I spent my time assembling, painting, & top coating the main furniture pieces for the room. 

I took a trip to Ikea with my three-year-old & eight-year-old & picked up this Tullsta chair.  It’s actually a pretty light-weight chair, but I felt like tough stuff carrying it up the stairs myself!

DSC_0885

Another empowering moment for me…assembling this Rast dresser (after painting & polycrylic-ing it).  Usually I leave all the assembling up to my husband, but he was out of town & I was anxious to make use of the storage this provides.

DSC_0895

I absolutely love using these as nightstands in kids rooms.  They are a good size & provide a good deal of storage.  The top drawer holds randoms, the middle drawer holds socks & undies, & the bottom drawer contains pajamas.  Yay for more storage in Elie’s dresser!

Those gold ring pulls were a DIY inspired by Sarah M. Dorsey.  I already had an extra set of Ikea curtain rings I wasn’t going to use, so I used them instead of the rings from the original tutorial. 

DIY Ring Pulls 2

I ordered this parson’s desk from Wayfair on Friday night around 5 pm & it was at my house by 3 pm the next day with FREE shipping!  (It must have been on sale when I ordered it because it was only $52.)

DSC_0888

I got another great deal on the lucite ghost chair that I won on a local auction site for $25!  I’m kind of jealous of my daughter for getting it!  I have at least three more places in my home I would love to have one of these chairs…  Maybe I will get lucky again!

DSC_0898

When my husband got home, I was ready for him to hang some shelves above the desk.  I have been working on styling them, but need to get some more accessories to fill them up.

To sum up today’s post, three important things to include when making over a kid’s space are: storage (bookshelves/nightstand), a comfy place to read, & a place to study—among other things, like a place to sleep, but we’ll get to that next week (I hope)!

Be sure to check out all the awesome room makeovers happening as part of the One Room Challenge!

DIY Mirrored Console Cabinet

As promised, today I am posting the details of how we built the mirrored cabinet in our family room.

DIY Mirrored Console

Supplies
  • 4’x8’x3/4” sanded birch plywood
  • 1”x2”x8’ pine (4)
  • 1-1/8” x 10’ lattice strip (3)
  • 60”x25-1/2” thin piece of plywood (for the back)
  • 2 1/2” wood screws
  • 1-5/8”x7 trim screws
  • 4 knobs
  • 8 hinges
  • 4 double magnetic latches
  • 6 Ikea Besta square white legs
  • mirrored glass (wait to purchase this)
  • primer
  • white paint (we used a semi-gloss finish)
  • caulk
  • liquid nails
  • mirror clips
To begin, we had Home Depot cut the plywood into two 60”x16” pieces (top & bottom) & three 25-1/2”x16” pieces (sides & middle).  Then, we attached the bottom piece to one side with three 2-1/2” screws.  Be sure to drill pilot holes first to prevent the wood from splitting. 

IMG_8934

Repeat these steps for the other side.

IMG_8937

Next, add the top piece to the sides the same way.

IMG_8938

Use a tape measurer to mark the middle of your rectangle.  Insert the middle piece at your marks & attach it, again with three screws going in the top & bottom.  (Please ignore the trash spilling out of the recycling bin in the photo below & all the papers on the floor the girls were coloring!)

IMG_8955

At this point, we added the legs & Mark began working on the doors while I sanded, primed, & painted the base piece.  (I used an orbital sander to sand down the raw/cut edges of the wood before priming & painting them.  After doing so, I thought it looked fine, but you may want to add veneer or trim to the raw edges.)  To create the doors, we cut the 1”x2” pine boards into eight 11-1/4” pieces (tops & bottoms of the doors).  Then we cut eight more pieces into 25-3/8” length which would be the sides of the doors. 

IMG_8956

My husband used his router to create an area for the mirror to set.  If you don’t have a router, I’m sure you could omit this step & just attach the mirror using clips.  Then, we attached the side pieces to the tops & bottoms using 1-5/8”x7 trim screws with a kreg jig to create the doors.

Next we attached the hinges to the doors.  In order for inset doors to function properly, a notch needs to be made the size of the hinge plate where it rests on the side of the door.  This allows for ample clearance on the hinge side of the door, while minimizing the gap between the door & the side of the cabinet.

At this point, I recommend attaching the doors to the cabinets just to make sure they do not need to be trimmed down or need any other adjustments.  (It would really stink to find out the doors were too big after the mirrors were cut & installed.)

DIY Mirrored Cabinet

Once we knew our doors would fit properly, we headed to Lowes & got mirrored glass cut to fit our openings.  I recommend measuring all the doors to make sure your glass fits properly.  (FYI:  Lowes will cut your glass for you.  Home Depot will not.)  We also primed & painted the doors before installing the glass.

Once we had our glass, we removed the doors & used some clips to attach it to the wood.  You could attach your mirrors with these fasteners if you did not route the edges of the doors.  We ended up using these clips & some mirror tape, which was kind of janky, but we couldn't find any clips that would work for us.  Be careful not to over-tighten the screw or the mirror could crack.

IMG_8963

We just put one on each side of the doors.

IMG_8964

This is what the doors looked like once the glass was installed.

IMG_8957

After a quick clean of the glass, Mark used an angle finder to determine the angle of the corners & cut the first diagonal piece of lattice strip (which we pre-painted). 

Most miter saws cannot cut such a sharp angle.  There are a couple of ways you can cut these angles.  Number one:  Using the angle finder, trace the line that you need to cut & cut it either using a band saw, jig saw, circular saw, etc.  Just cut it across the line.  Number two:  Some miter saws have a 90 degree fence that can fit into the miter saw.  Using the fence, subtract the angle from 90 degrees to determine what setting your miter saw should be at.

We then attached it using a thin strip of liquid nails.

IMG_8959

Again, Mark used his angle finder to determine the angle of the bottom corner & the angle at which it met the middle of the other piece of lattice.  He then cut the lattice & repeated the same steps to get the top half to complete the X.  Once those pieces were cut, we attached them with liquid nails.

IMG_8960

IMG_8961

You will want to caulk any gaps in the trim.

Once the glue was dry, we re-attached the doors & installed the knobs.  Then we added double magnetic latches.  These act as a stop so the doors don’t push through the cabinet.  The magnets on ours were a little strong, so I put some tape over them to lessen their strength (I feared the kids would pull them so hard they might break the glass…).

latches

Finally, we attached the thin piece of plywood to the back using some nails.

IMG_8962

I am still so happy with how this turned out! 


Click here to see the full tour of the family room.


Linking to the Pretty Preppy Party at Less Than Perfect Life of Bliss

Family Room Challenge: Tweaking the Entertainment Center

It’s time for another One Room Challenge update on the progress in our family room.  This past week, we spent our time re-working the entertainment center we had originally built five years ago from some Craigslist bookshelves & a sink vanity.  There was nothing wrong with the unit per say, but I had grown tired of it’s look & wanted something that wasn’t as big & bulky.  The TV cabinet was at least two feet deep & the top was probably 7 feet tall, so it took up a lot of visual space in the room.  Now that we have two full-sized sofas & a large coffee table in the room, I was ready to downsize these pieces.

First, let’s take a look at what we were starting with:


After seeing this design board come to life, I really liked the modern look of the dark TV cabinets with brass ring hardware in the middle of the doors.  Since we are making over this room on a pretty tight budget, we decided not to spend money on the Ikea Besta cabinets, but instead tweak our current cabinet to have a similar look.  Here’s what we did:

tv cabinet2

1. After removing all the doors & drawers, my husband first removed the top pieces & moldings.

2. Next, Mark took off the taller side pieces we had added to the cabinet.

4. (Oops!  I put these in the wrong order!)  The third step was to decrease the depth of the cabinet.  My husband marked a straight edge on the remaining top & side pieces about 17” from the front.  Then, he used his circular saw to cut off the excess on the sides & top.

3. Finally, we cut the front & sides right below the drawers, to lower the height of the TV. 

IMG_8848

I guess at some point we also removed all the base molding.  Once the piece was the correct proportions, we began building it back.  First, we re-attached the top, added the thin back piece, cut new pieces of finished plywood to add to the sides, & re-attached the baseboard trim along the three bottom sides.

Then, I painted the whole piece in a satin black & added these 3-inch ring pulls to the doors.

Here it is today: 

IMG_8891

You can still see where I filled the holes from the old hardware, so I need to work on those a little more. 

IMG_8893

Also, please ignore the kitchen set.  It is only there temporarily!

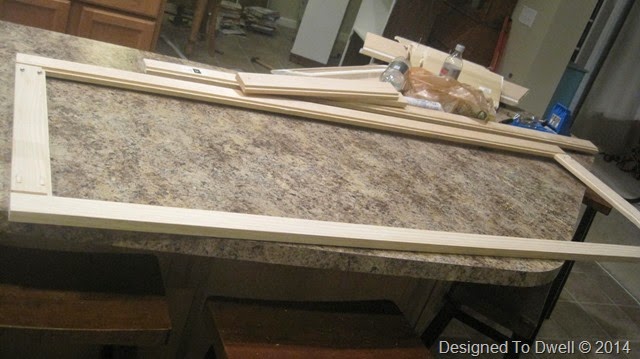
The next step was to make doors for the bookcases (in the picture at the top of this post).  This is the room our kids play in primarily, so I wanted a concealed space to store books, games, & toys.  My husband started out by cutting some 1x3 pine boards to size & then routed one side on each board.  He used the kreg jig to attach each of the four 1x2s together.

Building Bookcase Doors

Adding Doors to a Bookcase

Originally I wanted these doors to be mirrored, but I realized they would either constantly look dirty or I would always be cleaning them, so I opted for the cheaper, kid friendlier option, sanded plywood.  Mark inserted it in the frame & added a few staples to hold it in.

Adding Doors to Bookshelves

I knew the doors would need a little pizazz, so I searched the internet for an easy design, & sketched up a few choices for Mark to look at.  He liked none of them.  (I wasn’t crazy about any of them either…)  I mentioned that I liked the design on the glass doors on our secretary…


and he thought that was do-able.  A few hours later, he had the design sketched on the doors & was cutting the pieces.  He just used some lock-tight to glue them on & finished his work off caulking the whole thing.

When all that was done, I painted the bookcases & doors.  Once dry, Mark used some concealed hinges to mount the doors.

DIY Bookcase Door

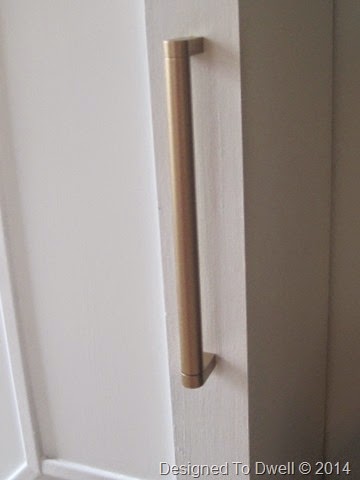
I spray painted these Ikea handles gold & installed them on the doors.
IMG_8906

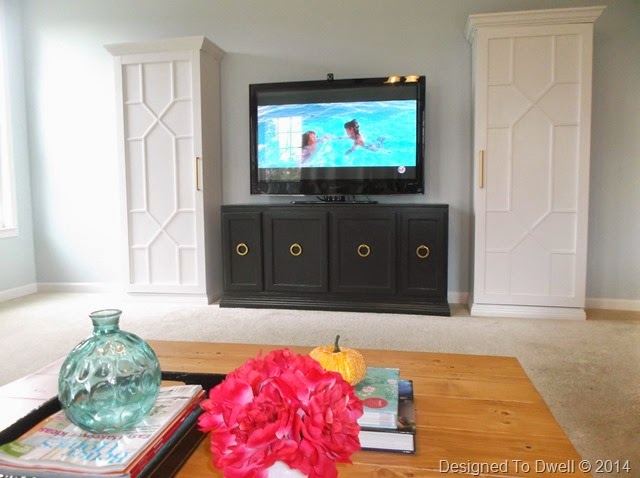
Here is the whole setup now…

Entertainment Center

Sorry for all the glares on the TV.

Bookcases Flanking TV

One more look back…

entcent

DIY TV Console

Along the way, I had a few doubts…Did the door design look too gothic?  Would one big door on the bookcases look too big?  Would the contrast between the black TV console & white bookcases be too much?  In the end, I really like the way they turned out!  Looking at the above picture, you would never know those were the same pieces as the “before” picture!  The icing on the cake is all the extra storage we have!  After filling up the bookcases with books, toys, & the puzzles & games (that were previously stored in the kitchen) we still have two shelves of unused space!

TV Setup

There are only two weeks left before this One Room Challenge is finished.  Here’s what I have left to do:
  • Paint walls & trim
  • Add window trim
  • Hang curtain panels
  • Make & hang roman blinds on side windows
  • Build coffee table
  • Address toy cubbies
  • Refinish side table
  • Hang art
  • Build console table
  • Tweak TV unit
  • Add doors to bookcases
  • Add pillows, lamps, rug, & accessories
This week I’m hoping to make the pillows & faux roman shades.  Maybe I can sweet talk my husband into starting on the console table too!

In case you missed out on anything, check out my previous progress:

Week One- Before & A Plan
Week Two- DIY Coffee Table
Week Three- More Progress

You can find many more room makeovers in progress on Linda’s link up party here.


I'm also linking to the Best of the Nest party.


LinkWithin

Related Posts Plugin for WordPress, Blogger...