Showing posts with label Mantel. Show all posts

Our Merry Mantel!

I hope you are all staying warm this week!  We have been blasted with several inches of snow & ice & I have been freezing my little toes off!  When the weather gets frigid, I enjoy sipping hot tea to the warmth of a fire & the glow from the Christmas lights adorning the mantel. 

I decided to change up the mantel quite a bit from the last several years.  After growing tired of my very fake greenery & being too scared I would catch the house on fire with the real stuff, I decided to forego greenery all together. 

Christmas Mantel

Two real pink poinsettias flank the mantel.

Pink Poinsettia

The space between them is filled with blue, gold, & silver ornaments & a string of clear Christmas lights with a white cord.

Christmas Mantle

I also hung ornaments on ribbon at various heights along the front of the mantel.

Ornaments Hanging from Mantel

Ornament Cluster on Mirror

A cluster of blue, gold, & silver ball ornaments hangs from the mirror.

Ornament Cluster

Here’s how that section of the family room is looking this year.

IMG_8180

Since the fire is nice & warm now, I think I’ll go grab a glass of tea & enjoy myself before the kids get home!

Styling the Mantel for Everyday

I have been wanting to change out the accessories on my mantel for some time now & I have finally found a look I am happy with!  Yay!  But first, we must check out what it looked like before…duh, duh, duh…

IMG_2695

I usually change the look of the mantel for Christmas & fall, but for the rest of the year, it looked like the picture above.  There was something about this look that just wasn't doing it for me.  Maybe it was the Tuscan style painting or the use of glass accessories that made it look so bland, but whatever it was, something had to change!

The changes began when I found a huge mirror to fit the space at Home Emporium.  I think it cost around $60, which is a great price, since the mirror is about four feet tall!  Originally, I didn't want a mirror here, since it would be reflecting a ceiling fan & kitchen cabinets, but I couldn't find any affordable art that I felt fit the space.  After searching for months, I finally decided a mirror would be great for year round use, since I like to hang wreaths above the fireplace for fall & Christmas.

After Christmas, I had my husband hang the mirror & the mantel sat empty while I scoured Pinterest for ideas.  I  didn't want to spend much money on the accessories, but I knew I would have to buy a few pieces, since I don’t have many tchotchkes to choose from!  Luckily, I scored a turquoise vase at Old Time Pottery for $11 & a faux succulent from Hobby Lobby for around $6 (after my 40% off coupon).

Determined not to buy anything else for the mantel (since I have spent all my spending money until hubby’s next pay day!) I spent all day Saturday playing around with the mantel. 

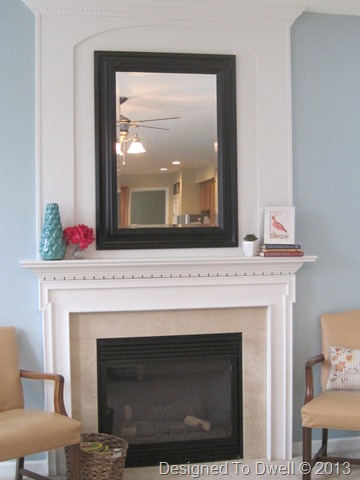
I can finally say that I love the new look!  Here it is:


IMG_6798

Doesn't it just look so cheerful?

IMG_6799


I’m so happy with this $11 vase from Old Time Pottery.  To add more visual interest, I paired it with a small bud vase from Wal-Mart (that I already had) & threw in some faux flowers.  I plan on using real ones once my rose bush starts blooming in the spring, but for now, fresh flowers on a weekly basis are not in the budget!


IMG_6800


On the other side, I added the faux succulent I found at Hobby Lobby for around $6 (after coupon).  Then I stacked some books in colors that coordinated with the room & topped them with a frame (from Wal-Mart I think).  I didn't want anyone to think I was showing favoritism for certain family members, so I took out the photo & added this bird picture I printed from Vintage Printable (and yes, I put sticky tack under it to keep the frame from falling off the mantel).


IMG_6801


The frame did a great job concealing the on/off switch to the gas fireplace.


IMG_6802


I’m so glad I finally came up with mantel décor I am actually proud of!

IMG_6803


I’m loving the cheerful pops of turquoise & pink!  I can’t stop looking at this space!  It’s amazing what a few changes can do to a room!

Sharing here:


TDC Before and After   My Uncommon Slice of Suburbia

It's Fall Y'all!

Happy second day of fall! 

Instead of decorating for Halloween & Thanksgiving, I usually just put out some fall decorations.  Honestly, I didn't really decorate at all for the fall holidays (or really any holiday except Christmas) until last year.  Seeing all these blogs with fabulous fall mantles made me want to do the same! 

Here is what my mantle looked like this summer:

{Summer}

And here is what it looks like decorated for fall...

{Fall}

My main inspiration for this mantle came from the picture below from Martha Stewart. 

I loved the look of this corn husk wreath hung on the mirror by gold ribbon.  I originally saw this picture & a tutorial At The Picket Fence.  Vanessa described herself as "craft challenged" & made the project look pretty easy.  I decided to give it a try.  You'll have to check out her post for the full tutorial & to get some other ideas she had for the leftover corn husks.

As you can tell from the summer picture of our mantle, we don't have a mirror hanging above the fireplace.  I didn't want to spend money on a big mirror right now, so I decided to use some brown packing paper to cover up the oil painting.  I just cut it to size & used a few pieces of sticky tack to adhere it to the painting so it wouldn't get damaged.  I couldn't find any pretty gold ribbon at Hobby Lobby, so I used some gold tulle ribbon to hang the wreath to the back of the picture.  (I just duct taped it to the back.)

{My version of Martha's wreath}

I removed the candles from their holders & replaced them with some Dollar Tree glittery pumpkins I picked up last year.


On the other side of the mantle, I filled a glass vase with faux acorns, (from Wal-Mart) another glittery pumpkin from the Dollar Tree, and a few faux leaves.


I filled the space in between with more faux leaves & clear plastic acorns (both from Dollar Tree), pine cones, & some artificial berry stems I already had.


It's not quite Martha's version, but I really like the way my fall mantle turned out.  I think it is both simple & elegant, which is the style I'm after these days!

Thanks for looking!  I hope you were able to find some fall inspiration for yourself!

Wendy
Joining these parties:

                The DIY Show Off    The Lettered Cottage

Family Room Update

I never really liked the picture frame hanging above the mantle in the picture below.


Originally, the frame was brown with gold accents.  After a few months of it hanging, I decided to take the plunge & paint the whole frame the dark brown that you see above.  I felt better about it for a while, but then decided I didn't like the contrast between the brown & the white, especially since that color of brown is no where else in the room.

This past week, I decided to try a new color of spray paint.  I gave it two coats of satin nickel & then brought it back in to hang on the wall.  The faux silver didn't do the frame any favors & my husband just started laughing when he saw it!!  Urgh!  I decided I needed to tame down the silver, so I used a t-shirt to rub some wood stain all over the frame.  After letting it sit for a few minutes, I wiped the stain off.  The result is below:

{Sorry about the crooked candle...}

This accented the designs in the frame & definitely toned down the faux silver.  I'm still not sure I like it, but this is how it will stay for now anyway!

Mantel Makeover

Last spring we decided to paint our family room, after 6 months of being tormented by builder-grade beige flat paint. By this point, the kids had learned they could color on the walls by scraping toys, or even clothing against it. Yep, that's how bad the paint was!


Can you see that?  Yes, I did just color on the wall with a toy!  (Don't tell my kids!)
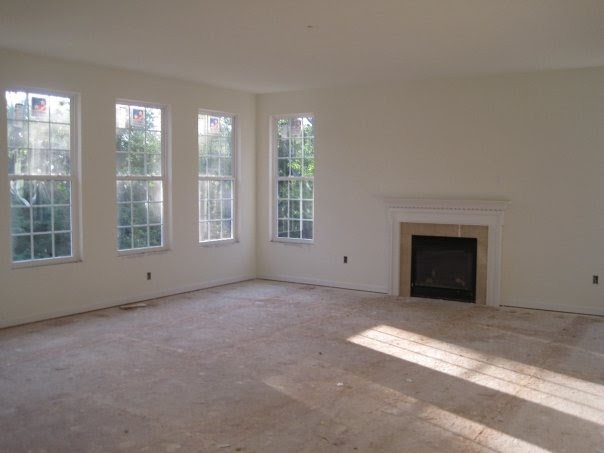
Oh well, that didn't show up quite as well as I had hoped!  Below is a picture of what the family room looked like before moving in (& before carpet!).


I knew I wanted to do something special above the mantel.  I had been to a neighbor's house & they had added wood above the mantel to create a small recessed area to hang artwork.  I thought it would be perfect for the space above our mantel.  Unfortunately, my husband hadn't seen it & I didn't even know what to call it (I still don't!  Please leave me a comment, if you know the technical name for this!).  

After scouring the Internet, we found a couple of pictures that helped my husband understand what I wanted, and he got to work!

Since this was done before I started my blog, I don't have pictures, but here's the basic rundown of what he did...

First, he grabbed two pieces of finished plywood we had used for another project.  He cut each piece to the width of the existing mantel & cut the height so they would reach from the mantel top to the ceiling.  Then, we took a flimsy yardstick, used it to figure out the curve we wanted, & traced it onto one piece of plywood.  After cutting the curve with a jigsaw, we flipped the wood & traced it onto the other piece of wood, so that when we put the pieces together it would give us a nice arch.  (Hopefully this is all making sense & you will understand when you look at the pictures below!)

Next, he hung the pieces above the mantel.  He added crowned molding to the top for some extra dimension.  At that point, it looked pretty good, but to make it looked more finished, he added some trim to the inside of the arch.  We also added corner trim to the outside pieces of plywood.

Here's a better picture of the trim.  Pay no attention to the bad paint job!
The final steps were to caulk the gaps, prime, and paint. 

Here's what it looked like a year ago:


And, here it is now:


I hope you enjoyed!  I better go clean that writing off the walls before my kids (or husband) see what I did!  Have a great weekend!

I'll be linking to these parties:


Funky Junk's Sat Nite Special


My Uncommon Slice of Suburbia
Photobucket

LinkWithin

Related Posts Plugin for WordPress, Blogger...