Showing posts with label Boy's Bedroom. Show all posts

Tween Boy's Bedroom Reveal

As I mentioned last week, my son's room is finally finished!

In my goals for the year, I was hoping to re-decorate my older kids' bedrooms. After upgrading our growing boy to a full-sized bed, the design was no longer working.
 

My goal was to create a lighter, brighter, more functional room with plenty of storage for all Zeke's collections, as well as a place for him to get away from his two younger sisters to read or study. I began the process on my son's room right after his eleventh birthday at the beginning of February, by first coming up with a plan & creating a mood board to help me picture the end result.


Other than the desk & chair, I would say the final product is a good reflection of the original plan.  We got started by removing the chair rail & painted over the dark, orange walls with a much lighter, reflective paint color, Toasted Almond.


The dresser was a Craigslist find that I found a few years ago.  I was trying to re-do this room on a very tight budget, so we ended up building the mirror above it, since I couldn't find one big enough in my price range.


I topped the dresser with a cheap tray from Hobby Lobby & some free printables I found online.


In the corner, I placed a Craigslist chair (the pillow is from Ikea) & we made the letter Z marquee & the faux Roman blinds.


To the left of the window, I created a unique gallery wall, featuring a lot of my son's collections (shark teeth, state quarters, rocks, & shells) along with a couple of printables & an owl he made in art class.


The most recent addition to Zeke's bedroom was the DIY rustic, upholstered headboard we built.  I didn't take any pictures of the process, so I will quickly describe it.  Basically, we cut a piece of 3/4 plywood to size (27"x58") & layered 2 pieces of a foam mattress pad on top of it (a couple of inches smaller than the plywood). Then, we covered it with a canvas drop cloth by stapling it in the back.
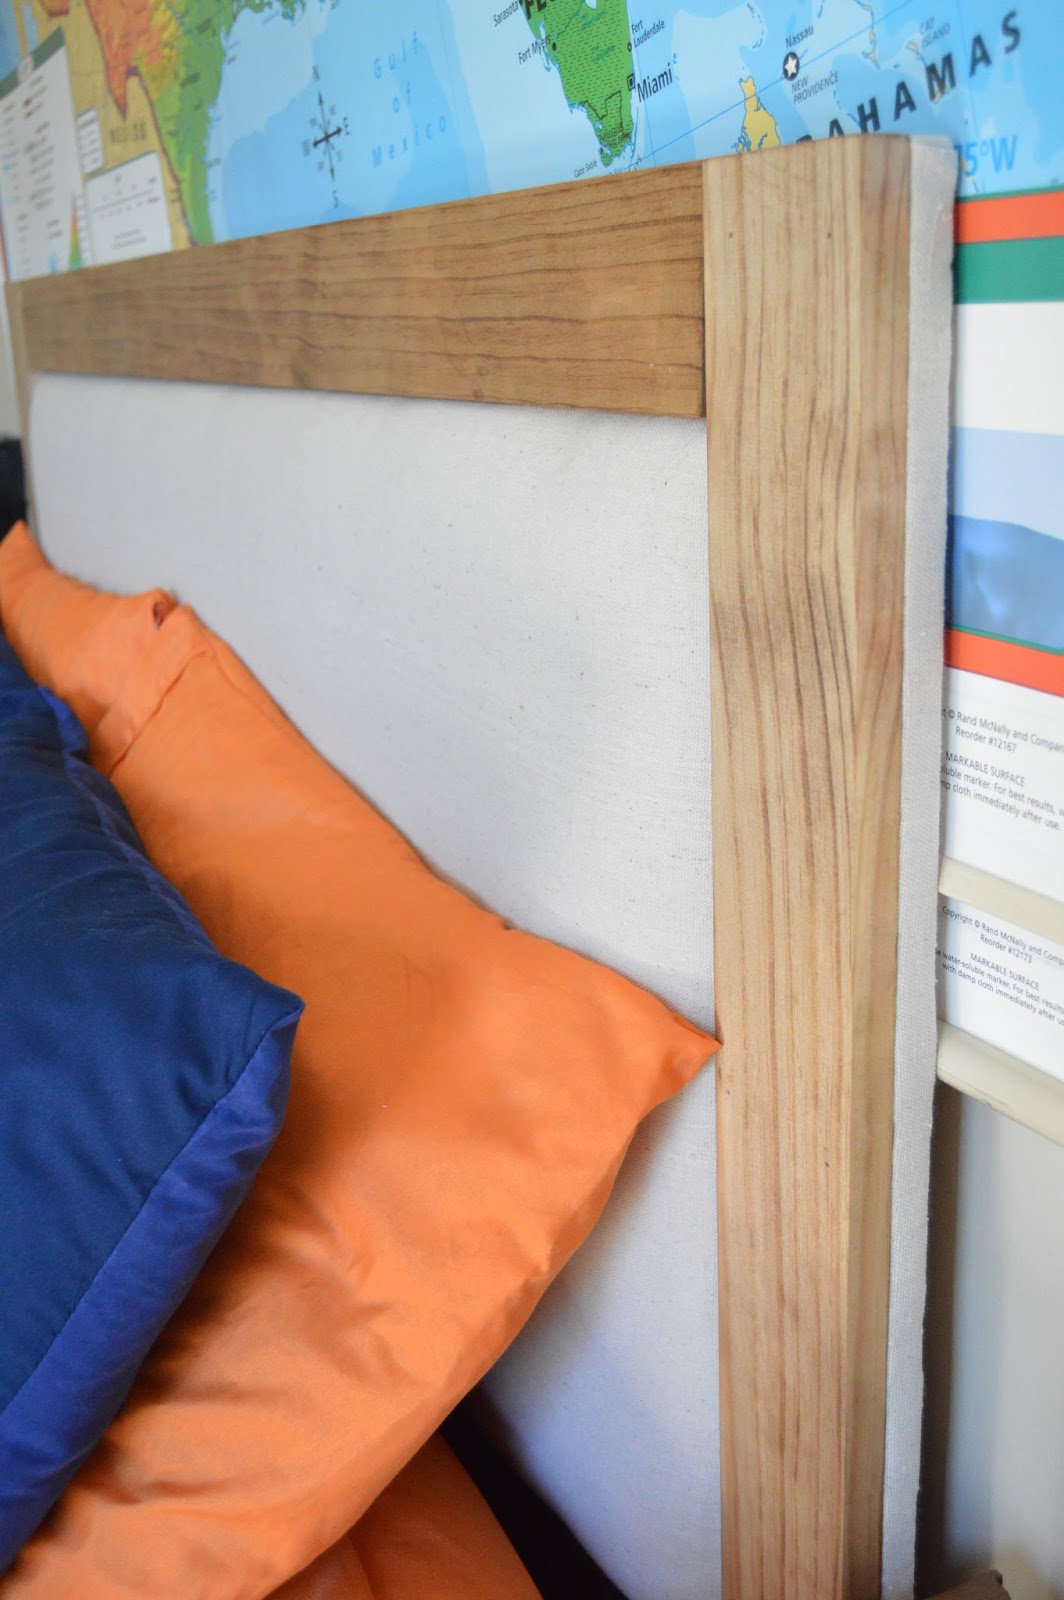

I stained 3" pine boards Early American color by minwax & we nailed them to the upholstered plywood, flush with the sides.  We made the two side pieces 48" long, so they would screw into the bed frame. We also reinforced the pine boards by screwing them in from the back of the headboard.


The entire process only took a couple of hours & turned out quite nicely if I do say so myself!


Above the bed, we hung a vintage roll-down map I found a few years ago on a local auction site. We flanked it with two Ikea Rast dressers. Links to the bedding can also be found here. The green pillow fabric came from JoAnn's-- I'm not sure what it's called.


We made use of the small wall between the two doors by adding some shelves to hold more of Zeke's things.


  Because of the tight space, we built a pull-down desk and an upholstered stool below the shelves.


 It's not the prettiest thing to look at, but I love how much space it saves & it's functionality.


Overall, this space is much better suited for Zeke.  It offers plenty of storage & fits his personality well, since most of the decor consists of his collections & artwork.  Hopefully, it will last him a long time!


DIY Pull-Down Wall Desk

Seven months ago, I decided it was time to re-decorate my eleven-year-old son's room & immediately sold his metal desk with hopes of replacing it with an X base desk.  Once we installed his full-sized bed, it became obvious I needed to come up with a different solution.  I decided to put my own spin on the Ana White Flip Down Art Desk.


We made ours 30" wide by 18" tall and opted for a magnetic board instead of a chalkboard on the front. We found the sheet metal for about $10 at Lowe's (it was in with the H-vac/conduit stuff).


I would have rather stained all the wood, but we were using leftovers & only had painted trim, so I covered it in black paint. (To be completely honest, I'm not really loving the look...)


We divided the inside in half & added a chain across the left side to hold some of Zeke's notebooks & magazines. On the right side, we added a shelf about 10 inches high to hold smaller items & the bottom shelf holds pencils, chalk, & crayons. I decided to paint the desktop in chalkboard paint for any notes Zeke may need to make.


We used two different types of hinges to keep the desktop at a sturdy 90 degree angle.  This was definitely the biggest struggle in the building process, which may have been user error!

  
 The roller catch we used keeps the desktop closed securely when not in use.  (You can see the strike on the desktop in the picture above & the catch is on the underside of the top part of the wall piece.) 


We secured the desk to the wall by using small L-brackets in each corner, making sure to get some of them into the studs.


Since we weren't able to give Zeke the X-based desk, we gave him an X-based stool instead.


We used these instructions for building the stool, but changed the size of ours to 19" wide by 12 3/4" deep by 19 1/2" tall (including cushion). We decided to put the wood on all four sides under the cushion, unlike the tutorial which only has it on the sides.  I stained the wood in Minwax Early American & cut two pieces of an old foam mattress topper to cushion the stool, along with some leftover fabric from Zeke's pillows.


After seven months, I am glad to finally have all of Zeke's stuff off the floor & back in his desk! Although I don't really love the aesthetics of this desk, I really do like it's function & space saving design.  Surprisingly, it holds more than my daughter's one-drawer parsons desk.


Curtains, Pillows, & the Letter Z


Every time I decorate a room, there comes a point where I’m not sure it’s turning out exactly how I had envisioned it.  That is how I had been feeling about my son’s room, until we hung the gallery wall & made a few other additions.  The game changer?

DSC_0866

This marquee letter Z my husband made!  I love the way this corner now boasts green, blue, & orange.

DSC_0840

Basically, it’s a 2x4 cut at crazy angles with holes drilled in it & filled with patio lights.  Still working on how to hide the cord…

DSC_0867

I also made a faux roman shade, which was another near disaster!  (It was completely crooked!  Luckily re-attaching it at the top straightened it out.  I would not have been shocked if it had really been crooked, since I’m horrible at taking measurements!)

DSC_0865

I made a couple of pillows for the bed.  The fabric reminds me of the game Space Invaders.  Anyone remember that game?  Not sure why it brings back that memory, but it made me think it would be great for my video game loving boy’s room.

DSC_0863

We framed out some mirrored glass too, so now Zeke can make sure he is put together in the morning, or maybe just check out his guns!

DSC_0866

DSC_0869

Only three more things to do before this room is considered “finished”…
  • Build a headboard
  • Build a pull-down desk
  • Build a bench
You can check out the plan for the room here.

Since his room looks mostly finished (with the exception of the pile of junk where his desk should be), I am going to be taking a little break from Zeke’s room to whip my daughter’s room into shape.  I will be participating in Linda’s (from Calling It Home) One Room Challenge Linking Party.  I guess I am just a sucker for a challenge!


I will be back Thursday with the plans!

Sharing at the Pretty Preppy Party.


TDC Before and After

Turning Kid Collections into Decor

I believe we have exactly two free weekends between the end of basketball & the beginning of spring soccer!  This past weekend was one of them, so we decided to make the most of it by knocking a few items off the list.

As I have mentioned previously, my son is a collector.  Until recently, some of his cool collections were just sitting in his closet.  In order to inject more of his interests into his bedroom décor, I decided to use those collections as artwork for his walls.

First, I hot glued his collection of shark teeth onto a piece of black cardstock & framed it in a shadow box.  (I surrounded it with a couple of free printables found here & here.)

DSC_0842

Next, we used a couple of nails to mount his collection of state quarters.  (Just a few more to find…)

DSC_0844

My husband built two display boxes for some of his most special rocks.  (This was a lesson in patience for both of us!  Who would have thought making these would have been so frustrating!  Black paint & wood filler are hiding a multitude of problems!)  He made the ceramic owl in school art class.

DSC_0846

DSC_0847

Lastly, I framed a rock, two shells, & a postcard of rocks we got at a “rock mining” tourist trap.

DSC_0849

Who would have thought all those things stashed in his closet could look so cool up on his wall!

DSC_0850

Boy’s Bedroom Makeover- Part Three

In January, I began making over my 11 year-old son’s bedroom.  Progress has been pretty slow moving, but today, I thought I would give an update on what has been accomplished.  Let’s look at some pictures, shall we?

After planning the space & painting the room, we hung the vintage map that I have been hoarding in my closet for two years!  My son wanted to keep it on this map of the US, but he can also flip to a world map or a map of Alaska & Hawaii. 

DSC_0820

Since I am only using my monthly spending allowance (plus money I earned through selling things on Craigslist) I had to save up before I could buy a couple of Rast dressers from Ikea.  I absolutely LOVE that these are so inexpensive, can be painted/stained to look great, & are a small size, with quite a bit of storage. 

DSC_0821

Before assembling them, I stained the outside pieces (Early American by Minwax) & painted the drawer fronts white.  I used the knobs that came with them for a while so I could save up to buy some ring knobs. 

Then, one day I remembered this post from Sarah M. Dorsey Designs showing how she made her own ring knobs.  (I also found this post helpful.)  Around the same time I had this recollection, I also remembered that I had two bags of Ikea curtain rings.  After assembling a cotter pin around the ring & inserting the cotter pin into a beveled washer, I spray painted them gold & followed up with a couple coats of clear acrylic sealer.  Then, my husband pushed the cotter pin through the holes in the drawers & spread them apart with the help of pliers & a hammer (kind of like how you use brass fasteners for kid crafts).  (The cotter pins were pretty tough stuff, so my husband had to do all the assembling & putting them in the drawers.)  I would say I only spent about $8 for all twelve knobs!  (Ignore the wonky one on the middle drawer, I should have straightened it out before taking the picture!)

DSC_0824

Next, I stained & polyurethaned two shelves, cut from an $8 board at Home Depot.  We used some “L” brackets for easy shelf installation, which cost another $6 (total).  Originally, I wanted three shelves, but it didn't end up working out, since we are planning on building a pull-down desk under the bottom shelf.

DSC_0826

My son is a collector, so this gives him a nice place to display some of his rocks, shells, weathered glass, & buckeyes.  I’m not sure what I’ll do when these collections grow, since we’re already running out of space!

DSC_0819

So far the biggest expense for this makeover has been the bedding.  Since we just upgraded Zeke to a full-sized bed, we needed new sheets, dust ruffle, comforter, & pillows

DSC_0827

I wanted to upgrade Zeke’s director’s chair to a more comfortable chair he could read or hang out in.  I was able to get this one on Craigslist for $75.  It is in great condition & is very comfortable.

Here is a look at most of the things that we still have to do in the room. Oh, shoot… forgot to add headboard in there…  We have to do that too!

Z room

We also need to build a pull-out desk & bench below the bookshelves, but PicMonkey was giving me a hard time, so I’m not going to bother labeling another picture!

DSC_0830

So, slowly, but surely we are getting things accomplished in this room.  I’m hoping that we can work on a few things this weekend.  I would love to have this room finished in the next couple of weeks so I can get started on my daughter’s.  (I'm picking up something for her space tomorrow, which has me excited about her room makeover!)

LinkWithin

Related Posts Plugin for WordPress, Blogger...