Super Duper Sticky Tack

I LOVE sticky tack!  It can be used for so much more than hanging posters & pictures!  Here are some ways I use it in my home:

1. Sticky tack can help keep candles stay straight (in candle holders). 

2. Sticky tack can help prevent things from moving (note the sticky tack inside the hurricane in the picture below...I wanted the candle holders to stay put, so I adhered them with sticky tack!)


3. You can add sticky tack behind hanging frames to keep them from sliding around & getting crooked.


4. You can use sticky tack to add a little bling to your walls!


How do you use sticky tack?  I'd love to hear!


   Photobucket

Picture Perfect Mother's Day

Okay, so I know Mother's Day has come & gone, without a mention from me!  I felt weird posting about it, since it can be a sad time for some. 

Last year was a really hard Mother's Day for me.  I suffered a miscarriage in October of 2009 at nearly ten weeks pregnant.  The baby was due on May 15th of 2010, but I would have been scheduled to be induced prior to that.  Anyway, our church always has baby dedication on Mother's Day.  It didn't hit me, until they began the dedication service that I most likely would have been up there with my baby, had I not miscarried.  I felt the heartbreak all over again.  I began sobbing uncontrollably, and we ended up having to leave church early.  I couldn't handle it. 

Although I already have two children, the loss of this baby was no less difficult.  I think about it often, and am lucky to have hope that I will get to meet my third child in Heaven!

I didn't want to post this on an already difficult day for many, but thought I would share it today.  My husband created these digital photo collages for me for the Mother's Day after each of my children was born.  (Okay, so I think he made Zeke's for my second Mother's Day!)


I'm pretty sure I will always have a place for these to hang in my house!  They are some of my very favorite gifts!  (Although I do really like the patio set I got this year!)

Setting Things Straight

Have you ever had this problem?


These candles have been driving me crazy!  I have to "set them straight" pretty much every day! 

Well, I came up with an easy fix.  I took my hot glue gun & made a ring around the upper-inner part of the candle holder.  Let it cool for a few seconds, & then insert your candle. 

Here's the ring of glue:


You can barely see it!

And, here is what my candles look like after this quick fix:


Much better!  (After 24 hours & a tweak to that one in the back that still looks a little crooked, they are still straight!)  Woo Hoo!


Curvaceous Headboard

On the list of items we needed for Elie's room was a headboard.  Since I am cheap, I was hoping my husband could just make one from plywood, instead of having to buy one!
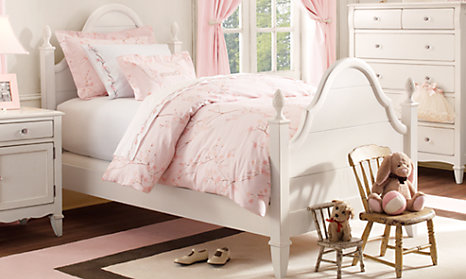
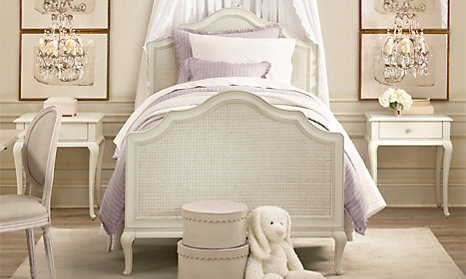
I loved these from Restoration Hardware Baby & Child, but wasn't quite planning on spending $900+ for a bed!


I showed these inspirations to my husband and asked if he thought it was possible to cut the shape out of plywood.  He thought it was possible & agreed to go to the hardware store for supplies while I tried to draw & cut the shape out of a piece of wrapping paper.

To create the shape, I unrolled a piece of wrapping paper as wide as the headboard would be.  Then, I folded it in half & drew half of the shape.  Then I cut it out, while folded, to create an even template once unfolded.  (Unfortunately, it got thrown out before I thought to take a picture!)

Next, I gave this drawing to my husband who traced it onto half a piece of plywood & then cut it out using a jig saw. 


Then, from the other half of the plywood, he cut the same shape again to create a 2 inch piece of trim (see below).


He nailed this to the front of the bigger headboard piece and added a wooden decoration to dress up the front.  Here it is all put together:


Here are a few more pictures once it was painted & installed:


I like the way it turned out.  Easy on the eye, & at about $25 total, very easy on the wallet!


I'm linking to these great parties:

    Photobucket  


   The DIY Show OffMy Uncommon Slice of Suburbia   Weekend Bloggy Reading  Furniture Feature Fridays 

Chalkboard on the Cheap!

So, a while ago I posted about a boa wreath I made for Elie's room that just didn't work out.  Needless to say, I was frustrated and in need of a new piece of art to hang in it's place.  Later that day, I went in the basement & saw this:


I really did like this picture, but wasn't using it since I changed the decor in my living room.  I decided with a little paint & trim, I could make this a cute chalkboard for my daughter's room.

Basically, I quickly spray painted the metal at the top & bottom a flat silver (it's all I had).  Then, I painted on two coats of chalkboard paint, and added some pink & white polka dotted ribbon I had on hand.

I think it turned out pretty cute:


Elie can even tuck special cards in between the ribbon.

The only bad thing about Elie having a chalkboard in her room is that she is too busy playing with it at night to go to bed!  Maybe bedtime will get easier once the newness wears off!

Partying here:


    A Marvelous MessThe DIY Show Off

Pretty In Pink

What should have only taken a week to tweak is finally finished (after a few more weeks & tweaks than first expected!)…

Welcome to my daughter’s pretty in pink on pink on pink bedroom:

Let’s take a closer look at some of the details…

I designed Eliana’s nightstand to also be used as a vanity.  The mirror was a $6 find from Family Dollar that I spray painted silver.  I spruced up the lamp & displayed some of Elie’s finest jewelry on the necklace stand.  The shelf below holds some of her favorite princess books as well as a jewelry box & hatbox full of the rest of her jewelry collection!
I added some trim and a bow to the mosquito netting to add a little more glamour to it.  My husband built the headboard (more on that in another post…) and I made lots of pillows to accompany the bedding.  I found it a couple of years ago on Overstock.


The other side of the bed houses some favorite bedtime stories & a chair for reading.  I recently changed the artwork, which is printed from Graphics Fairy and transformed some unused artwork into a chalkboard.   
My mom made both the pink gingham curtains & the white panels.  The panels were made from a twin flat sheet.

Here is the other side of the room. 

Elie has had many tea parties at her Raggedy Ann & Andy table.  The table was a perfect fit for the room as it has scalloping under the top (which mimics the walls & curtains) and pink painted gingham on the table & chair tops (the curtains, pillows, & bedskirt are also pink gingham).  It came from Toys R’ Us a few years ago.

 We recently added the shelf & accessories.  The frog prince is one of my favorite accessories in the room.  I found it for 50% off at Hobby Lobby.  I might have paid $5 for it!

The dresser recently got new knobs and accessories.  You can read about the lamp here.

I also love this cute princess piggy bank, which I got for 50% off at Hobby Lobby.  I recently painted the paper mache boxes, added pink & white polka dotted ribbon as trim, & tied them with a pink bow.
     
Here’s another angle in the room.  You can see the paper doll art, dollhouse, & ribbon stool that I posted about.  I love her pretty ballet costume hanging on the wall & can't wait for her June recital!


To create the scallop border, I cut the shape out of cardboard & traced it around the room.  Then I painted around it.  When my husband came home his first response was, “Looks like a pink ocean!”.  Since that was NOT the look I was going for, I decided to add some jewels (with sticky tack) to give it more of a “crown” look!
Here's one more peek before you go!

The DIY Show Off My Uncommon Slice of Suburbia    Photobucket    Weekend Bloggy Reading   

LinkWithin

Related Posts Plugin for WordPress, Blogger...